Microsoft Teams is arguably the most used business productivity app on the market with approximately 320 million Monthly Active Users (MAU) reported in Q1 2024.
For Teams Phone, Microsoft reports that 80 million of these users are activated. That's around 30% of the entire Teams user base.
These numbers demonstrate just how popular Teams is with enterprises. With such large numbers comes complicated user management for those administrators responsible for maintaining a Teams' service offering within their business.
In this whitepaper, we will be exploring the complexities of user change management within Teams and the best practices you should adopt to ensure smooth and efficient adoption of Teams within your enterprise.
Understanding Teams Phone
Teams Phone is an add-on feature to Microsoft Teams. It enables enterprise calling features like external phone calls for your users and allows you to replace your traditional phone solution with a unified communication platform.
It features all the calling capabilities you need for a robust and flexible phone platform:
- Direct dial
- Call forwarding
- Call hold
- Call transfer
- Group calling
- Auto attendant
- Call queuing
- Call delegation
- Many more (so many that the feature parity discussion is no more)
With these features comes over 500 different configuration settings and options to choose from. These help you tailor the Teams Phone experience for each of your user groups.
In addition, Teams offers detailed reporting capabilities into call quality and usage so you can keep control of your spending and proactively maintain a high performing calling service.
Where you need additional features like compliance call recording, complex contact center, or omnichannel communication, Microsoft has a healthy ecosystem of certified partners that have solutions that work seamlessly with Teams Phone.
Teams Phone User Types
The major use case for Teams Phone is to enable your business users to make and receive external calls using a direct dial number. For example, calling another business in another location that is not part of your Teams environment. This could be calling your external accountant, who is not part of your business and has their own phone system and phone number.
However, there are a number of other use cases for Teams Phone:
| Shared Calling for Teams | Shared Calling for users: Shared Calling for users allows multiple users to share the same phone number to make outbound external calls using their individual user account and Teams client. |
| Crafting new meeting rooms experiences | Meeting rooms: Meeting rooms, common area / shared devices, voice applications, and service phones can use Teams Phone for external calling. You can enable Microsoft-certified Teams Rooms, whether they are Windows or Android based, for direct dial calling with Teams Phone. When enabled, your users will be able to use these devices as a conference or loudspeaker phone to call customers or join external audio-conferencing calls hosted by your external customer. |
| Comon area phones | Common area phones: You might also have phones available throughout your office building, in corridors, and other communal spaces that can be used as a shared resource for your workers. These are used for ad-hoc outbound calling or as a device a user can pick up a call from if they are away from their desk by using Call Park. For these types of devices, you have a good array of choice from certified Teams Phone device vendors such as HP/Poly, Audiocodes, Crestron, and Yealink. |
| Shared devices | Shared devices: Essentially the same as common area phones but located in a department for shared use. An example might be Goods Inward in your warehouse, or the staff canteen. |
Going beyond shared use devices, Teams also offers integration with more service-based phone devices using SIP via its SIP Gateway. Devices like lift phones, intercoms, and overhead paging can be connected to Teams Phone using SIP Gateway (if they are supported).
If you have implemented voice enabled applications, perhaps you've purchased a Teams Extend contact center or even built your own custom solution in Azure Communication Services (ACS), these need a resource user account enabled for Teams Phone if they needed to be called externally.
All these devices and users need to be managed and configured with appropriate settings to use Teams Phone as they are intended.
Teams Phone Connectivity Options
When connecting Teams to the external calling world (PSTN – Public Switched Telephone Network) you can choose from four main connectivity options.
| Connectivity | Information | Reference |
| Microsoft Calling Plan | Microsoft provided PSTN connectivity – available in 35 countries | Microsoft |
| Operator Connect | Exclusive partner interop program with over 100 operators certified to provide calling in up to 75 countries | Operator Connect |
| Direct Routing | Open door connectivity for any provider or company to connect their PSTN connection to Teams using a certified Session Border Controller | Direct Routing |
| Teams Phone Mobile | Exclusive to mobile operators, Teams Phone Mobile enables mobile number direct dial to your Teams client and mobile device at the same time | Teams Phone Mobile |
Microsoft Calling Plan

This is a licensed feature available from Microsoft and purchasable like any other Microsoft subscription.
When purchased, you can acquire a phone number for a user and provide them with PSTN calling via Teams Phone.
Calling Plans are purchased on a per user, per month basis and include an amount of pre-committed call minutes. Plans are available for both domestic only and international calling.
Minutes are pooled together within the same SKU for all users assigned to consume.
‼️ Any unused minutes at the end of the month are lost and aren't carried over.
Microsoft also offers pay as you go calling plans for a cheap monthly rental on a per user per month plus pre-paid calling credit using Communication Credits.
Operator Connect

Operator Connect is a certified program between Microsoft and licensed carriers / telecom operators.
Carriers who join the program interconnect directly with Teams Phone using private managed network connectivity between their data centers and Microsoft Azure. The minimum requirement is two independent 10GB/s direct peering connections from independent data centers for high availability and resilience, in addition to certified Session Border Controllers (SBCs) for Teams.
Each operator must pass a rigorous testing phase before being certified and invited to publish their offer in the Teams Admin Center (TAC).
When you select an Operator, your calling connectivity to Teams Phone will be provided by them and you will pay your phone bill directly to them, not Microsoft.
Using an Operator can be beneficial to you when Microsoft Calling Plans aren't available or you're looking for a more cost-effective solution.
Direct Routing

Direct Routing allows you to connect your own SBC to Teams Phone to provide PSTN connectivity.
This solution can be used when you're unable to use a particular Operator via Operator Connect or Calling Plans aren't a suitable option.
Direct Routing is often seen as the most expensive but most extensible option. It's deemed expensive as you will need to purchase, maintain, and support your own SBC infrastructure as well as managing support between Microsoft, SBC vendor, and your chosen carriers.
Some telecom operators offer Direct Routing as a Service (DRaaS) where they take away the complexity and upfront cost of SBC purchasing and replace it with a managed service for a lower monthly rental.
Teams Phone Mobile

Teams Phone Mobile is a niche connectivity option for users who want their mobile number to also be their Teams number.
When enabled, they can make and receive calls using their mobile number from the Teams client on their desktop or their native mobile dialer without the need for the Teams mobile app or data connectivity.
This option is only available via select mobile carriers in limited countries.
Note: You aren't limited to selecting one connectivity option per tenant. You can take advantage of all of them and apply them to users where needed.
In fact, many enterprises find themselves deploying a mixture of connectivity to suit both their business and geographic needs.
While this flexibility gives you the best connectivity option based on individual user needs, being able to understand who and what needs to be deployed in a particular use case can be an operational challenge to manage on a day-to-day basis.
Teams Phone Licensing
Teams Phone licensing can be complex to understand – especially when trying to make a purchasing decision. Essentially, to use Teams Phone, a user needs four things:
- Microsoft Office 365 plan
- Teams Enterprise license
- Teams Phone Standard add-on license
- A Calling plan (Microsoft, Operator Connect, or Direct Routing)
How they are assigned depends on the connectivity option chosen for the user.
| User Connectivity | Licenses Required |
| Microsoft Calling Plan Domestic | Office 365 F1,F3,E1,E3 (Without Teams) Microsoft Teams Enterprise Microsoft Phone Standard Microsoft Domestic Calling Plan Communication Credits* Or Office 365 E5 (Without Teams) Microsoft Teams Essentials Microsoft Domestic Calling Plan Communication Credits* |
| Microsoft Calling Plan International | Office 365 F1,F3,E1,E3 (Without Teams) Microsoft Teams Enterprise Microsoft Phone Standard Microsoft International or Domestic Calling Plan Communication Credits** Or Office 365 E5 (Without Teams) Microsoft Teams Essentials Microsoft International or Domestic Calling Plan Communication Credits** |
| Operator Connect and Direct Routing | Office 365 F1,F3,E1,E3 (Without Teams) Microsoft Teams Enterprise Microsoft Phone Standard Or Office 365 E5 (No Teams) Microsoft Teams Essentials |
| Teams Phone Mobile | Office 365 F1,F3,E1,E3 (Without Teams) Microsoft Teams Enterprise Microsoft Phone Mobile Or Office 365 E5 (No Teams) Microsoft Teams Essentials Microsoft Teams Phone Mobile |
* Communication Credits are required if the user needs to call numbers outside of the inclusive destinations supported by the plan. These include shared cost and premium domestic numbers.
** It is possible to provide international calling with a domestic only calling plan by using Communication Credits to fund the international calls.
In addition to standard user licensing, shared devices, meeting rooms, and resource accounts have their own unique licensing structures should you want to activate them for Teams Phone.
| User Connectivity | Licenses Required |
| Common Area Phone and SIP Phone | Teams Shared Device License Calling Plan (if required) |
| Meeting Room | Teams Rooms Standard or Pro Teams Phone Standard Calling Plan (if required) |
| Auto Attendant & Call Queue Resource Accounts | Teams Resource Account Calling Plan (if required) |
License Changes Affecting Teams
In 2024, Microsoft announced the unbundling of Teams (as a whole, not just Teams Phone) from its Office 365 Enterprise license plans due to the demands from the competition's regulator.
Teams will now be sold as its own standalone license, which you will need to buy in addition to your Office 365 E or F plans.
There are two licenses to choose from:
- Teams Essentials
- Teams Enterprise
Only Teams Enterprise can be paired together with a Teams Phone Standard license to enable calling for users.
Confusingly, the Teams Phone Standard license is still included in the Office 365 E5 license plan, but you will need to buy Teams Enterprise as well to use it.
Teams Phone Numbers
Teams supports two types of phone numbers:
- User number: Can only be assigned to user accounts, both individual and shared device.
- Voice service number: Can only be assigned to a voice application resource account like an auto attendant, call queue, audio conferencing, or third-party voice application.
Numbers can be converted between uses via the TAC when provided by Microsoft or by contacting your operator or using your Operator management portal if supported.
For Direct Routing numbers, these can be assigned to all user types without needing to pre-select which number type it should be.
Ordering Numbers
The process of ordering phone numbers differs depending on your connectivity. For Microsoft Calling Plans, phone numbers can be acquired directly within the TAC.

If Microsoft has inventory in the chosen location, then acquisition takes just a few minutes. If Microsoft doesn't have availability, you can submit a request to the telephone support desk to request inventory. This process can take a few days.
For Operator Connect, you can contact your operator to acquire the numbers you need. Some operators may even have a self-service portal where you can acquire numbers from their inventory directly.
The same process is used for Direct Routing and DRaaS.
The difference with Direct Routing and DRaaS is that when your numbers have been supplied, you may need to reconfigure your SBC to route those new numbers to and from Teams for them to become usable. With Operator Connect, this is done for you automatically.
Phone Number Management
The TAC provides basic number management capabilities for Microsoft and Operator Connect numbers. All your numbers will show in the TAC and their assignment status making it easy to find an available number and assign it to a user.
As of February 2025, number inventory and management for Direct Routing is in preview mode.

Although the TAC gives you the ability to hold your Microsoft, Operator Connect, and now Direct Routing number inventory, it falls short by not allowing you to categorize or allocate numbers of a certain type to a business location or use case.
When supporting tens of thousands of numbers, being able to categorize them to business needs becomes critical for efficient Teams Phone management.
Extensions
Extensions in Teams are supported with Direct Routing supplied phone numbers. In a Teams only environment, there is no real need for extensions anymore as people can be called by name.
However, if you're integrating Teams Phone with other phone systems that use extensions and not all users have access to the Teams client, extension dialing may be the only way for them to communicate.
If this is required, Direct Routing is needed as only this method of connectivity supports extension dialing.
When you deploy extensions, you'll have to keep track of the extensions you're assigning to users. These can change based on office location and you may have to implement several dial plans with normalization rules.
Extension management can get complex – especially when the same extension number is used in different locations separated by a pilot number or location access code.
In Teams, you could assign the extension number directly to a user as their Calling Line Identity or primary number. This isn't the best practice, but it is possible. Then you'd use the Caller ID masking policy to replace the extension number with the office pilot number on your SBC.
The supported way is to assign an extension as an attribute to a user's Line URI. A Line URI is the user's phone number string e.g. tel:+441234567890.
To attach an extension to this Line URI, you append it using the ext attribute.
Example: Tel:+443300570658;ext=12345
In this example, 12345 is the user's extension number.

Often, the user's phone number is the common number e.g. main office and not their direct number, although sometimes a user can have both a direct number and extension number.
Directory Search
Teams Phone can provide a directory search function using an auto attendant.
An auto attendant with directory search enabled can find Teams users by name or extension number using voice or dial pad inputs.
When found, the auto attendant will connect the caller to that person.
By default, auto attendants will search your entire Entra ID directory. You may want to customize the scope of the search to a particular group of people based on the location or business service the auto attendant is fronting.

This is achieved by scoping the auto attendant's search capability to only include certain security or distribution groups within your Entra ID directory. Users can then be added to (or excluded from) those groups depending on your requirement.
Be aware that every auto attendant is enabled for directory search. You can't turn this feature off. All you can do is disable voice input. However, should the caller use their keypad to enter digits, the auto attendant will attempt a directory search (even if you haven't told them in a greeting message).
Also remember that, by default, the auto attendant is configured to search all users. Should an extension be found, the auto attendant will transfer the caller. This can lead to unwanted calls.
It is best practice to configure all auto attendants to exclude the default users group from its search scope unless your auto attendant has been explicitly created for directory search purposes.
Shared Calling
Shared Calling for Teams Phone allows users to share the same outbound caller identity and calling plan.
Unlike standard Teams Phone users, these users are voice enabled without a Line URI (direct dial number) and are assigned a Shared Calling policy that will 'proxy' all their outbound calls via a resource account that could be attached to an auto attendant.
With Shared Calling users, the configuration is a little different. Not only are you voice enabling a user without a phone number and assigning a Shared Calling policy instead of a voice routing policy, but you're also changing the way emergency calling works for them.
You will need to set up emergency call back numbers that are special numbers that reside in a pool that are temporarily allocated to a Shared Calling user in the event they dial the emergency services. Luckily this is setup once inside the Shared Calling policy.
Auto Attendant and Call Queue Resource Accounts
Auto attendants and call queues are Teams Phone applications. When these applications are required to make or receive external phone calls, they must be voice enabled and assigned a phone number.
To do this, they need to be assigned the Microsoft Teams Resource Account license. This license bundle includes the Teams Phone license.
Only resource accounts attached to an external facing auto attendant or queue need to have a phone number.
If the external caller is transferred from the public answering account to another account, then the resource account attached to the transferee doesn't require a phone number.
However, all resource accounts attached to call queues and auto attendants require the Resource Account license to be assigned regardless of whether they have a number assigned to them or not.
Emergency Calling
In most countries, including the United Kingdom, it is a legal requirement for enterprise phone systems to provide a way for users to call the emergency services.
In the United States of America, the laws go further. Enterprise phone systems must supply the physical location of the user making the call as well as a direct call back number.
Depending on which state your business is in, the location can be anything from campus main entrance to campus building and campus building including floor and sub-office within a few thousand feet.
Locations are supplied automatically by the phone system using the PIDF-LO (Presence Information Data Format – Location Object) SIP header that contains the address and location of the device making the phone call.

In Teams, you create your emergency locations. You start by creating a location and supplying the street address along with the longitude and latitude.
Then, depending on the laws involved you may have to go further and identify areas within that location phones could be located.
This is done by uploading your computer network information like subnets, switch names, port numbers, and wireless access points.
You then combine your locations into an emergency calling policy for each office location and assign that policy to users and devices located within them.
In addition, each phone number must be assigned an emergency location address. This is the default minimum location that number is attached to. Enriched data is passed to the emergency services by the emergency calling policy associated to the device or user.
Dynamic Emergency Calling (Dynamic E-911)
The information in the PIDF-LO header can be changed based on where the user is located.
When they move between offices, their emergency location will update automatically should the network be identified by the Teams location service.
When they're working away from the office, at home for example, the user will have the option of setting their emergency address directly on the Teams client.
It is important when provisioning users for Teams Phone that they are assigned the correct emergency calling and emergency call routing policies that apply to them.
Failure to do so can lead to fines and even imprisonment.
User Policies
When it comes to user configuration management, Teams accomplishes this by using user-based policies.
Each policy represents a Teams feature and contains all the configurable settings for that feature. As of November 2024, there are 39 different feature policies that can be applied to a user.
For a list of all policies and settings, please view the Microsoft Teams policy reference documentation.
With so many policies and policy options, you can get very granular in tailoring the Teams experience for each type of user.
Depending on the size and distribution of your enterprise, you can find yourself with lots of policy versions that are tailored to an office location, department, job role, and even specific to a VIP user.
For example, you may have a different dial plan policy for each site. In addition, you might have multiple voice routing policies for that site to control PSTN access for users located within each. Then you might have other policies like caller identity, compliance, call park, voicemail, as well as collaboration-based policies like meetings and chat.
This presents a huge challenge for operational teams to document and insert into business processes all the different combinations that make up a Teams experience for a user.
Policy Hierarchy
Teams operates a two-tier policy hierarchy. At the top level of each policy hierarchy is the global or "org-wide" policy. Underneath you have per user policies.
You can edit the global policy, but you cannot create more than one global policy within the same policy set.
If you've managed Lync or Skype for Business, you may have restricted your global policies to be least privilege as this was the recommended approach for this product.
With Teams, best practice is to use the global policies to provide a feature rich experience to your most common user type. By doing so, most of your users will automatically inherit a usable experience out of the box without you doing anything other than licensing them for Teams.
Then you can create a user policy variant for each user type that will have either a more enhanced or restricted experience beyond the default.
This will make provisioning of users a lot easier as you will need to do less.
When policies are applied to the user, they will inherit the policy settings set by the global policy and then any additional policy settings applied by a per user policy.
Where a user policy setting conflicts with a global setting, the user policy setting will win.
Policy Assignment Methods
Policies must be assigned to a user for them to take effect. Once assigned, the effects of the policy can take up to 24 hours to reach all devices a user is signed into.
Unfortunately, there is no foolproof method to speed this process up. You can try signing out and back into Teams and clearing the local cache on the user's computer. But changes to Teams, from a back-end perspective, are not real-time and therefore delays from 15 minutes to 24 hours are common.
There is no need to assign a global policy. These are automatically applied to every user. User based policies can be assigned in three ways:
- Manually on a per user basis using the TAC
- Using the Teams PowerShell module to grant policy assignment on a per user basis
- Group policy assignment
Using the TAC is a great way to make ad-hoc changes to user policies quickly when you're troubleshooting or processing a support ticket for a non-standard change. However, using this method for bulk user provisioning isn't efficient as you have to apply each policy.
Call Queue Agent Assignment
Some of your Teams users will be agents in one or more Call Queues. With Call Queues, you can assign agents in three ways:
- Explicitly assign to a queue as an agent (Direct agent assignment)
- Become a member of a security group
- Become a member of a Teams voice enabled channel
| Assignment Type | Max Agents | Benefits | Disadvantages |
| Direct Assignment | 20 | Least administrative effort for small queues. Complete control over agent hunting order, especially round robin, and serial hunting. Agent membership can be delegated to department leaders in their Teams client. | Time consuming to manage as an admin when you've got more than 10 queues. Limited by the number of agents supported. |
| Group Assignment | 50 | Best for organizations with more than 10 queues to manage. Easier to provision agents. Maximum number of agents. | Agent membership can't be delegated to department leaders. Unable to use serial or round robin agent hunting methods effectively. No controls over which agents are active when a group has more than 50 members. |
| Voice Enabled Channels | 50 | Shared call history between agents in Teams channel tab. Agent opt-in visibility. Department leaders can manage membership based on team members. Supports all members of a team. | Unable to use agent serial or round robin hunting methods. Shared voicemail retrieval requires Power Automate. Doesn't support private channels. All members of team considered agents when some may not require it. |
Did you know? You can assign up to 39 policies to a new Teams user.
Not all policies are available in the TAC. Some can only be assigned using PowerShell. This can make the provisioning and management of users complicated from a support perspective.
Fortunately, you can cut down the amount of work required using Group Policy assignment. Here, you can assign Microsoft 365 groups to policies so members will automatically be assigned the policies that are tied to that group.
This can reduce the effort needed to provision users. However, depending on the complexities of your business requirements and user types, managing tens or even hundreds of groups will be a challenge.
Advanced User Calling Features
Teams Phone users have access to advanced calling features like simultaneous ring and call forwarding destination options.
Users can choose to simultaneously ring their mobile, a group of colleagues, or forward to a person or group of people if a call is unanswered after a few seconds.
Users can also designate call delegates to make and receive calls on their behalf as well as control their call settings like voicemail and call forward.

Typically, these can be set up by the users themselves in their Teams client. This is something you should promote as a benefit to users rather than taking on administrative control of these.
However, for some high-profile users you may want to pre-configure or manage these as an administrator. You can do this in the TAC or PowerShell.
Building a Robust Provisioning Plan
Provisioning and managing Teams Phone is an extensive challenge to overcome. However, with the correct planning, operational procedures, and tooling you can achieve a consistent experience for your users and support teams.
It's important that your first task is to plan the Teams Phone experiences your business needs and expects for seamless operation.
To do this, you need to create a profile for each user type within your business that matches the expected Teams Phone experience.
This is called a user persona. To be able to create a user persona, you need to first understand the business requirements along with the functional needs of each user so that you can create the required policies.
User Analysis
It's tempting when moving from your old system to Teams to just create what you have today. You might think this is a guaranteed way to ensure migration success.
It isn't. It's a guaranteed way to create significant amounts of tech and management debt in your IT organization.
Following your original PBX configuration, users have become more comfortable with internet-based chat, calling, and meetings. Their reliance on phone features has greatly reduced.
Now is a good opportunity to discuss functional requirements with your department leaders so you get an up-to-date view of what's important to them as a business unit to operate.
!! Don't skip this step! In many cases, this step yields unexpected cost savings.
One way to collect this information is through an interview process. Setting dedicated time aside with each department leader to discuss their communication needs focuses the minds and will yield better engagement than sending out an email survey.
First, approach the leaders with your vision. Many department leaders won't be aware IT is looking to transform their calling platform, so you don't want this to be a surprise to them. Communicate with them early so they have time to come to terms with it and this will bring a more positive response during your interview process.
Schedule a meeting either face to face or virtual giving them at least two weeks to prepare. They'll need time to reflect and evaluate their needs first, so giving them good notice will mean fewer meetings overall.
Be sure to send them a copy of the interview questions you'll be asking along with some high-level information about how Teams Phone will work for them.
When creating your interview questions, be sure to ask the same questions to each department but leave room for them to bring additional information to your attention. The goal here is to align their needs with the native features of Teams to produce a gap analysis document.
| Question | Response |
| Basic Calling Needs | |
| How many of your users need to make external calls to suppliers or customers? | |
| How many of these users call international numbers? | |
| Do you know roughly how often your users rely on external calling? | Heavy | Moderate | Low |
| How many of your users receive incoming calls from external suppliers or customers direct to their own personal number? | |
| Shared Calling Needs | |
| How many of your users require infrequent / ad-hoc external calling? | |
| Could these users operate without access to such a feature? | |
| Advanced Calling Needs | |
| If a user is not available, what happens when a call is received on their number? | Goes to voicemail | Rings the office | Rings specific people | Rings out |
| Are there any users within your department who make or receive calls on behalf of others? | |
| Are there any numbers or places of origin that shouldn't be able to contact your users? | |
| Service Functions | |
| Does your department have any call queueing needs? | |
| Do you know how callers reach your queue? | Call direct number | Via auto attendant(s) |
| How are calls in the queue distributed to your users? | Serial | Attendant | Round-robin | Longest idle |
| What hours is your queue open? | |
| What happens when someone calls outside those hours? | |
| Who are members of this queue? | |
| Who would be the owner(s) / managers of this queue? | |
| How many callers need to be waiting in the queue before you can't accept any more calls? | |
| What should happen to any call that exceeds this limit? | Disconnect | Voicemail | Keep place in queue | Route somewhere else |
| What languages should your queue support? | |
| Do you have a custom greeting? | |
| Does this queue still function as you need or would you like to adjust it? | |
| What are your service numbers? | |
| If you have more than one queue, what caller options do callers have when they dial your number(s)? | Press 1 for. Press 2 for. Directory search, etc. |
| If you have an option to leave a voicemail, who currently receives this? | |
| Devices | |
| How many shared use phones within your department that can be used by anyone? | |
| If calls to these phones could be delivered to users' PCs via the Teams client, would you still require a physical phone? | |
| All phone features can be provided using the Teams client on your PC. Can you think of reasons as to why some of your users still need a physical device? | |
| All users will be issued with a USB headset. Are there any users who might find using these difficult? | |
| Are there any users that require additional aids for communication? | |
| Other | |
| Do any of your users answer calls made from specialist devices like intercoms? | |
| If you control an intercom / door access solution, how is the door unlocked? | |
| Do you use a fax machine? | |
| Do you have a paging / Tanoy system? | |
| Do you have a requirement to send broadcast messages to phones? | |
| Compliance | |
| Do any of your users need their calls to be recorded for compliance purposes? | |
| Do you need any form of sentiment analysis on call recordings? | |
| Do you need access to workforce management features like analytics and reporting of usage? | |
| Other | |
| Any other information that might be important to discuss goes here. | |
MoSCoW Analysis
When you have your requirements, score them using the MoSCoW grading.

Use the table below to list every Teams Phone feature and decide whether you need to enable it. If you're planning for the long-term, introduce a "Could" column so you can refer back to this in a few years' time.
| Feature | Must | Should | Won't |
| Domestic calling | |||
| International calling | |||
| Shared cost number calling | |||
| Toll-free numbers | |||
| Extension dialing | |||
| Customized dial plans per location | |||
| Customized voice routing for least cost | |||
| Outbound call restrictions based on user and destination | |||
| Simultaneous ring with policy control to prevent | |||
| Delegate call management | |||
| Silent notification of delegate calls waiting | |||
| User controlled voicemail | |||
| Call queuing | |||
| Auto Attendant services with IVR and time of day routing | |||
| Directory search by name | |||
| Directory search by extension | |||
| Group call pickup with customizable delays | |||
| Keep my place in the queue with auto call back | |||
| PSTN call agents in queue (mobile device) | |||
| On call distribution | |||
| Historical call analytics with key metrics | |||
| Call disposition in analytics | |||
| CRM integration with auto screen pop | |||
| Last agent routing | |||
| Unassigned number routing | |||
| Private lines | |||
| Executive call barriers | |||
| Anti-spam and call blocking | |||
| Caller ID masking | |||
| Custom hold music | |||
| Shared Calling for users | |||
| Emergency calling with E-911 compliance |
After this exercise, you're able to identify:
- If Teams Phone can natively support your calling needs
- What types of policies and licenses you're going to need to assign to users
Creating Your User Personas
Now you have the business requirements nailed from, you can start to build your user personas.
A user persona is a collection of policies, settings, licenses, and features that are applied to a user that matches a specific job role within your business.
In sales, you want to ensure that all sales agents have a phone number, international calling plan, and open Salesforce when a call is received.
In addition, you want to ensure sales managers can report on the number of calls they make and the quality of the sales conversations.
In this example you have two user personas:
- The sales agent
- The sales manager
The sales agent will need a DID number, associated calling plan, and a custom calling policy that will launch Salesforce when Teams receives a call. They'll also need a compliance recording policy so that the sales manager can evaluate their performance.
The sales manager may not need a direct phone number but needs access to the compliance recording and reporting solution you've added to Teams.
In your HR department, your officers may not need a direct dial number but need to be members of the HR call queue and can make domestic outbound calls from the shared HR number.
As you go through each user type, you will come across new policies and requirements you need to build into your user provisioning personas. Equally, you'll come across policies that are reusable between different personas.
When you have a policy that can be used with multiple personas, best practice is to duplicate the policy for each persona type.
This may seem like needless complexity, but should your business requirements change in the future, that means you need to change a policy setting for one type of user and not the other, then sharing policies across personas will restrict your ability to implement it.
How to Create Personas
A persona typically lives in an Excel document. This document outlines all the identified personas within your business and maps them to specific Teams policies and settings (e.g. number location and type to assign).
The persona document is the provisioning bible for technicians who are responsible for Teams user management. It should be revised at least once a year to ensure it's up to date with your current business needs.
The following items should be included in a user persona:
- Persona name
- Persona description (who it is meant for)
- Country the persona applies to
- Microsoft 365 licenses required
- Security Groups the user must be added to
- Phone number type (area, tag, type) to apply to the user
- Dial Plan to assign
- Voice Routing Policy to assign
- Caller ID Policy to assign
- Emergency location and policy
- Other Teams policies to assign (voicemail, meetings, chat, calling etc.)
- Call Queues to add the user as an agent to
- Teams to add the user to
Create Your Policies
Now you have your personas defined, you can create your Teams user policies. Before jumping into the TAC, it's important to decide on your policy naming convention.
Naming conventions make admin tasks a whole lot easier to follow. What convention you choose is up to you. However, if you're going to automate this process with PowerShell scripting, it's best to avoid using hyphens in your naming.
Using hyphens in PowerShell means the property is treated like a command, so you must escape the property with double quotes. If this is forgotten by technicians, it'll result in failed processes and potentially unwanted outcomes.
It's also recommended that you include the persona name in each policy so that it becomes easy to assign the correct policies without needing to trawl through pages and pages of procedural documents.
Use underscores instead or camelCase. For example: uk_standard_london or ukStandardLondon
Global Policies
Global policies are inherited by everyone. They are the default policy for each policy type. Out of the box, they have most of the Teams feature configurations enabled.
In many cases, global defaults will be enough for your users. However, depending on your business needs, these may need to be altered.
Review your user personas you created. Do you have a baseline experience every user should have when they start at your business? You should have.
Edit each global policy to apply your most common experience. This will help reduce the amount of administrative overhead you need to perform during each new hire. It will also guarantee a supportable and predictable experience for your users that's in keeping with your basic business requirements.
Once you've established your baseline experience, you can then build your custom policies to match each additional user persona.
User Policies
You'll need to create a user policy for each policy type where the persona expected experience differs from the default experience.
For example, you may have five offices based in the UK, each in a different location. You may have a persona that dictates that users in each of these offices need to dial local subscriber numbers without entering the area code in their dial plan. Or you may have internal shared service numbers that route to different sub-teams depending on the office location, e.g. 5555 routes to local IT support.
To meet these requirements, create a dial plan in Teams for each of the locations that include the required number transformations.
Example
| Dial Plan Name | Translate from | Transform to |
| uk_persona1_mcr | Local: ^(\d)$ | +44161$1 |
| Internal: ^5555$ | +441612300714 | |
| Domestic: ^0(\d$ | +44$1 | |
| International: ^00(.*)$ | +$1 | |
| uk_persona2_bim | Local: ^(\d)$ | +44121$1 |
| Internal: ^5555$ | +441217415718 | |
| Domestic: ^0(\d$ | +44$1 | |
| International: ^00(.*)$ | +$1 |
(Regex patterns simplified for the purpose of demonstration. For more detailed regex patterns please visit https://ucdialplans.com)
If you have a common set of policy settings between multiple user personas, it can be tempting to use one policy. Technically, there is nothing wrong with doing this if you're sure that users in all affected personas requirements will never deviate.
However, if you want complete flexibility and to build a scalable provisioning solution, it's best practice to duplicate the policy and name them specifically for each persona. This will allow you to affect change easier in the future.
Entra ID Security Groups
Using Entra ID security groups is an easy way to apply Teams policies and call queue memberships to users that requires no scripting or third-party automation tools.
For each persona you create, create an Entra ID security group with the same name.
Then, using Teams Group Policy membership, you can associate policies with security groups, target licenses allocation, and with call queues, you can assign the group as the call agent answering target.
All you'll need to do then is to add the appropriate users to that group and they will automatically be assigned the persona experience.
When it comes to changing a user's experience because they've moved roles, you simply need to remove them from one provisioning group and into the appropriate new one.
It's important when defining your provisioning security groups that you don't overuse the group in other areas of Teams. For example, enabling it for team collaboration or associating it with access to a SharePoint site collection, etc.
Keep the groups specifically for the provisioning of Teams settings. When it comes to user change, users may lose access to data they still need. This will cause users to drift away from provisioning and management compliance standards and slowly unravel all your hard work.
Although group-based provisioning does most of the heavy lifting when it comes to delivering Teams settings for users, it doesn't provision a phone number. This is still a manual task for you to complete.
You could automate this using Power Automate with a SharePoint list or Excel Spreadsheet containing numbers and an Azure PowerShell Runbook.
If this is something that you would like to use, MVP Martin Heusser has created a package to deploy this.
Create Your Phone Number Spreadsheet
Phone number management in Teams is basic.
You get a view of numbers that are available and assigned. You also get some basic filtering capabilities so you can find an appropriate number.
However, there isn't a way to categorize your numbers for certain uses. For example, by office location, department, business use case, or other attributes that fit into your number allocation criteria.
If you use a mixture of Operator Connect, Calling Plan, and Direct Routing numbers, you'll need to manage these off-platform, perhaps in an Excel spreadsheet.
With spreadsheets, however, comes a huge risk to data discrepancies as changes made to the live system aren't reflected in the spreadsheet.
Fortunately, with Microsoft 365, you can take steps to dynamically keep that spreadsheet up to date using Power Automate and OneDrive.
This will help you keep on top of your phone number inventory when changes are made to Teams outside of standard processes.
Create Your Licensing Method
There are two ways to assign licenses to users in Microsoft 365: direct and group based. Typically, most businesses use group-based licensing.
Group-based licensing removes the need for you to manually assign licenses to users. Instead, you associate your persona provisioning security group to the Microsoft licenses you want to apply to members. Then, as soon as you add a user as a member to that group, they are assigned the associated licenses if they're available.
When it comes to Teams Phone, if you haven't purchased E5 licenses, then Teams Phone Standard license is a paid add-on. If this is you, then you're probably cost conscious and only want to assign this license to users that require calling features.
When this is the case, you'll need at least one of the following provisioning security groups:
- One for the base Teams persona
- One for the calling persona
- Potentially another for any department specific configuration like Call Queue membership
The user will need to be a member of both groups.
For example:
| Persona Group | Licenses | Teams Policies | Teams Queues |
| uk_standard_user | Microsoft Office 365 E3 | uk_standard_chat uk_standard_meeting uk_standard_calling uk_standard_app etc. | |
| uk_voice_mcr | Microsoft Teams Phone Standard Domestic Calling Plan* Communication Credits* | uk_voice_dialplan_mcr uk_voice_routing_mcr uk_voice_emcy_mcr | |
| uk_voice_mcr_hr | uk_voice_mcr_hr_cli | Manchester HR Call Queue Manchester HR Sickness |
(* if using Microsoft Calling Plans)
Users can be members of more than one licensing group. When they are, they will inherit the licenses of each group if they're compatible with each other. If they aren't, licenses won't apply. You won't receive an error alert, but this will be logged in Entra ID audit log which requires proactive monitoring.
If you have E5 licensing, then Teams Phone Standard is inclusive of this so it can reduce the number of provisioning groups needed.
Some administrators choose to deselect the Teams Phone license in E5 from users. Don't do this. All you're doing is creating unnecessary work for yourself.
As you're already paying for the license in E5 and the features of Teams Phone only become available when you assign a number to a user, descoping the Teams Phone license from your base license provisioning group isn't benefiting anyone. It's better to assign it and leave the features dormant than not to.
When you come to activate a user for Teams Phone, it's then much simpler than having to remember to move the user into another group to assign the license, then wait until that has taken effect, and then assign the number.
As you work through each persona iteration, the number of licensing and provisioning groups will increase. With this will come complexity in management of change.
You'll need to be careful when moving users between groups. If you disrupt some features users still need access to, their new memberships could change or remove.
User Targeting
Building your personas, provisioning, and license groups are the core foundations of your provisioning solution. However, you do need to decide on how you're going to identify users with those provisioning experiences.
Are you going to manually add users to the required groups and assign appropriate phone numbers? Or are you looking to automate some or all of this?
Chances are you're going to want to automate a lot. Some items like phone number activation may still be a manual process because you have a business policy that requires manager approval.
In Entra ID, a user object has many attributes like job title, department, office location, country etc.
You can use these attributes to create dynamic membership rules for your provisioning groups so all you need to do is make sure the user account is created with the right attributes and Entra ID will take care of the rest.

Create Your Provisioning Solution
Now you've got all the pre-requisite tooling and personas defined, you can now think about putting these together to make a provisioning solution for your business.
In this walkthrough guide, we're going to show you how to provision users using group-based targeting with some scripting and Power Automate to help assign and manage phone numbers. The principles used can be applied to your specific scenarios.
Step 1 – Create Your Entra ID Security Groups
Follow your persona template to create the required security groups for Teams provisioning.
To do this, go to https://entra.microsoft.com and head over to Groups > Create New Group.

Give the group a name. E.g. "Prov_UK_Standard_Baseline" and a description so other admins know what this group is used for.
In the membership type, change this to "Dynamic User".

Now we're going to add a dynamic query to match all users who have the country attribute set to the UK.
Click on Add Dynamic Query
Select the property 'country' and its matching operator and value.

The press Save. Then create the group.
Now we're going to repeat the process to add another group that will target users for Teams Phone policy settings for the Manchester Office.

Next, add a dynamic query to target the office location of the user.

Now we're going to do the same but for the London office.
Next, we need to create department-level provisioning groups. These will target users in specific departments and apply bespoke settings to them. E.g. make them call agents in call queues or assign department shared number caller identity.
Depending on your setup, you may need to localize these if you have a department in multiple locations that requires different call queue memberships and caller identities.
Assuming this is the case, let's create two more groups to target the HR department in Manchester and London so they can have separate provisioning flows.
The query will now need to include two clauses: one for the city and one for the department.
Save and create the group.
Create another one for London in the same way but replace the city value to equal London.
You should now have the following groups created:
To recap what we have just done, we've created Entra ID security groups that will be used to assign the appropriate Teams licenses, policies, and queue memberships to users and created dynamic membership policies so that users get automatically added to these groups based on their user attributes.
Step 2 – Assign Licenses to Groups
Now the groups are created, we're going to assign the Microsoft 365 and Teams licenses required to each of the groups as follows:
| Group Name | Licenses To Assign |
| Prov_UK_Standard_Baseline | Microsoft Office 365 E3 (No Teams) Microsoft Teams Enterprise |
| Prov_Teams_Phone_Manchester | Microsoft Teams Phone Standard |
| Prov_Teams_Phone_London | Microsoft Teams Phone Standard |
| Prov_Teams_Phone_Manchester_HR | No licenses required |
| Prov_Teams_Phone_London_HR | No licenses required |
Microsoft has changed the way group-based licensing is administrated. From Sept 1st, 2024, group-based licensing is now controlled in the Microsoft 365 Admin Center.
Go to https://admin.microsoft.com expand Billing > Licenses and then select the license you want to assign.

From there, click on the Groups tab and then Assign Licenses.

Add the group name you want to assign the license to using the matrix table and press assign.
Now repeat for each license combination you need.
Step 3 – Associate Your Teams Policies with Provisioning Groups
The next part of the process is associating the Teams Policies you've made for each persona type to the Entra ID security groups. You can do this in PowerShell or the TAC.
We're going to be assigning the following policies to our group examples as follows:
| Group | Teams Policies | |
| Prov_UK_Standard_Baseline | None – use global policies as default | |
| Prov_Teams_Phone_Manchester | Dial Plan | UK Manchester |
| Routing Policy | UK Domestic Manchester | |
| Calling Policy | UK Manchester | |
| Prov_Teams_Phone_London | Dial Plan | UK London |
| Routing Policy | UK Domestic London | |
| Calling Policy | UK London | |
| Prov_Teams_Phone_Manchester_HR | Caller ID | UK HR Manchester |
| Prov_Teams_Phone_London_HR | Caller ID | UK HR London |
Head over to the TAC and then navigate to Voice > Dial Plans and select Group Policy Assignment.

Click on Add then choose the provisioning group to assign a policy to.
Example: Prov_Teams_Phone_Manchester and select the Manchester dial plan. Leave the rank as 1. We're not making cascading policies.

Press Apply.
Repeat the step to apply the London dial plan to the London Provisioning Group.
Now go to the calling policy in the TAC and do the same.
Next, go to the voice routing policy and add the domestic routing policies for each.
Finally, we need to provision the caller identity policies for the HR users in London and Manchester. So, we repeat the process and assign the HR provisioning groups to the associated policies.
Now this is setup, users matching the group criteria we made with Entra ID dynamic group memberships will inherit the required licensing and Teams settings.
Let's test it out.
We're going to configure Christie Cline to be an HR representative in Manchester and Debra Berger to be a HR representative based in London.
We can check they've been dynamically added to the Teams baseline group that will assign the base licenses for Microsoft 365 and Teams.
They will also inherit all the global Teams user policy settings we have applied for the default Teams experience.
As Christie is located in Manchester, they will also be members of the Teams Phone Manchester group and Debra the Teams Phone London group.
And again, with the HR groups.
We can also check their Teams policy assignment in the TAC.
You can also check the policy assignment status in PowerShell by running the below command:

For your normal Teams users and Shared Calling users, this could be enough configuration. The next steps are purely for Teams users who require external calling in Teams.
Step 4 – Change Call Queue Memberships to Group Based
Now we need to add the users as agents to call queues. To do this we can use the group-based agent membership feature of the call queue.
Users will not become agents of the queue until they're enabled for enterprise voice either through number assignment or Shared Calling.

Edit the call queue, navigate to Call Answering, then change the option to Add Group and add the provisioning group to the queue and press Submit.

Repeat for the London call queue group replacing the group membership to that of the other provisioning security group.
Authorized Application Users
Teams Auto Attendants and Call Queues can delegate their management capabilities to department / service managers. This reduces the reliance on IT admins to make operational changes to a call queue or auto attendant.
Authorized users have the right to change operational configuration like opening hours, agent queue membership, and IVR options. But they can't delete or alter the underlying routing and behavior of the applications.
Delegation of these tasks to service owners is important for business productivity and something you should consider as part of your service offering.
Unfortunately, at this time, there is no way to group assign authorized users to either of these applications. They must be explicitly defined in the TAC.
To do this, open the call queue or auto attendant configuration and navigate to Authorized Users and add in the user accounts you want to grant access to.

Authorized users must be enterprise voice enabled even if they aren't going to be agents of the queue they manage. Therefore, they need to have a phone number or be enabled for Shared Calling as a pre-requisite.
You can control the level of editing privileges they have using Voice Application Policies.
Navigate to Voice > Voice Application Policies and create a new policy for each admin experience.
When you have finished creating the policies, you'll need to assign them to users individually. There is no group policy assignment method for these policies yet.

You can also assign this policy using PowerShell using the Grant-CsTeamsVoiceApplicationPolicy commandlet.
Step 5 – Assign a Phone Number
So far, we've managed to provision the Teams user automatically with their full Teams Phone experience without writing a single line of code or creating Power Automate tasks.
When it comes to assigning a number to a user, this task still requires some manual intervention.
There are two ways to assign numbers: using the TAC or Teams PowerShell.
If you're using Microsoft Calling Plans or Operator Connect for Teams Phone, your numbers will show in the TAC under Voice > Phone numbers.

From this view you can assign users a number. Select a free number and press Edit.

Enter the user's name, then select an emergency location, and press Apply.
This will enable the user for calling and their dial pad will show up in their Teams client.
The phone number management in Teams is a little basic but it's functional for most mid-sized organizations.
When you're managing hundreds of numbers in different countries and assignment states, you can find the numbers you need by using the filter.
To find available numbers to assign, use the filter Assignment Status and set the value to Unassigned.

Be sure to update your number spreadsheet with this assignment.
If the assignment fails, it will be due to one of two reasons:
- The user doesn't have the Teams Phone Standard License assigned
- The number you're trying to assign is already assigned to another user
Now your provisioning of Teams Phone users is complete, and 95% completely automated, without writing a single line of code or creating Power Automate tasks.
If you work in a small to mid-sized (100-1,000 users) organization, where assigning a Teams Phone number is always going to be a requested add-on that requires management / cost center approval, then you probably don't need to spend time and effort automating the assignment of this.
Larger organizations will need to implement approval-based automation between their ITSM solution like ServiceNow or Salesforce so numbers can be activated and assigned as part of an automated self-service process.
For these organizations, implementing a dedicated number management and Teams provisioning solution makes sense.
Selecting a Teams Phone Automation Tool
When it comes to managing thousands of phone numbers across different geographies, Excel spreadsheets aren't the solution.
You can make an elaborate spreadsheet that allows you to sort, filter, tag, and categorize numbers to make it easy for you to find the number you need. However, unless you have a reliable and regular method to ensure this file is kept in sync with Teams, it's going to become less of a tool and more of a problem.
Naturally, humans will look for the path of least resistance. But shortcuts often lead to incorrect processes and long-winded remedial work. One genuine shortcut, without repercussions, however, is simply updating your spreadsheet.
Before you can begin to automate Teams Phone number assignment, you need a reliable tool that will organize and keep your number assignment in sync with Teams.
What to Look for in a Phone Number Management Tool
When researching a suitable tool, you'll need to ensure that the tool's features support your vision and needs in Teams. At the very least, the number management software should include:
| Must Haves | Nice To Haves |
| Automatically build number ranges from your Teams tenant so when you purchase more numbers from Microsoft or your Operator Connect partner, these numbers appear in your number management tool. | Proactively alert admins when number ranges are becoming fully allocated. |
| Synchronize the user assignment of numbers to the number records to ensure that availability and usage is representative of what is configured in Teams. | Ability to assign number categories to user personas so the next free number in the category is automatically selected. |
| Ensuring when change happens directly in Teams it is reflected in the number management tool automatically. | Ability to protect Teams configuration against out of process changes. |
| Allow number categorization by type, location, and business use case. | Pro-active number reservations for future use. |
| Enable descriptions or labels to provide contextual awareness for other administrators. | Number quarantine when numbers are unassigned for a period in case they need to be re-assigned back to the same user. |
| Ability to directly assign numbers to Teams users from the number management solution rather than using the TAC or PowerShell as a separate process. | Granular role-based control that permits admins in different areas to manage their permitted numbers and users. |
| Audit process to log change of numbers. | API for programmatic initiation of a number assignment or unassignment. |
Top 5 Best Number Management Tools for Teams
- Orto by Callroute
- Ziro
- Teams Boss
- Kurmi Software
- Code Software
When it comes to selection of your product, it really comes down to features you absolutely need and can't live without – and cost.
Many organizations will compromise on the selected product due to cost and replace the capabilities of the tool they really wanted with human workarounds, custom script processes, or both.
The reality is that doing this will end up costing you more than buying the tool you need, and you won't end up solving the problem you set out to solve in the first place.
Codeless Solutions
When you're looking for a tool to automate Teams provisioning, your objective should be to remove any requirement for using your own scripts.
Using API endpoints is great for solving small and bespoke problems, but they shouldn't be the main interface for creating automation. You're buying a tool to alleviate complexity and reliance on custom scripts and processes, not add to them.
If you need to deploy Power Automate flows or Azure Runbooks to sit between your number management tool and Teams, then you probably have the wrong product.
They may appear flexible, but remember you must build, maintain, and support the automated middleware between that system and Teams. When it breaks, it's your responsibility to solve and you may not always have the skills within your team to do that.
Choosing a tool that can schedule, automate, and manage provisioning all within a single user interface and without code (even low code) is critical for streamlining your provisioning process and relieving your admin resources to do more important jobs.
Integrations
An important part of any provisioning solution is integration with your ITSM systems. Automation is great, but not all provisioning tasks can be automated without first obtaining approval from a senior manager.
The most common example of this in Teams Phone is the enablement of Teams Phone and a number for a user.
As assigning a number and associated calling plan represents a cost to the business, some may want to gate this task with an approval process. After approval, the process of assignment can be automated, but first, someone needs to say 'OK'.
You may be already using an ITSM system like ServiceNow, where you can build your own internal products in your service catalog. One of these products could be Teams Phone, where the user completes an order form providing their justification for needing it.
Using ServiceNow workflows, you can create a process that requires approval from the cost center owner. Once approval is received, ServiceNow can process the request by triggering the appropriate actions, scripts, or tools.
Integrating your number management tool into something like ServiceNow workflows will enable you to automatically assign a Teams phone number to the user without your service desk team needing to manually do it.
How Much Should You Pay for a Provisioning Tool?
In the world of SaaS, we're used to paying per user per month. But does this model really fit a Teams Phone automation tool? After all, once you've assigned a number to a user, its job is pretty much done for that user until there is a change.
Experience says most organizations want the costs presented to them as a per user, per month figure. Ultimately, the cost is the same in both a monthly vs per annum model. It's just the presentation of that cost.
You should be approaching the pricing from a value standpoint. Today, doing Teams Phone provisioning tasks manually can cost you $45 in resource a time, and that's if your team get it right the first time.
Get it wrong and that cost can rise to over $80.
For a 1,000-user business with national averages of staff turnover, this can equate to over $300,000 of IT admin salary being spent on Teams provisioning processes.
This isn't counting the amount of time end users are underproductive waiting for IT to complete tickets.
With a Teams Phone automation tool, not only can you release the burden on your IT staff, making them more efficient, but you reduce the vast majority of errors. You're able to implement standards that are baked into automated processes and not circumnavigated or misinterpreted.
Imagine a world where you didn't need to keep a 100-page process document up to date and run intensive training courses for engineers to communicate and act on these changes into process.
Imagine the process was programmatically laid out, controlled, and instantly understandable to engineers when they login.
This is the value a Teams Phone provisioning tool brings to your business. If they cost $100,000 a year, they're saving you at least $200,000 a year in lost productivity organizationally.
Can You Automate for Free?
Many IT admins will look towards their own experience and skill to come up with creative ways of implementing automation with technology they already have access to. As a result, of course there are ways to automate Teams Phone provisioning for 'free'.
The question really is: 'As a business, is that something that you want to support?'
And is it really "free"?
You may be able to create your own scripts, database, and process automation to bind it all together, but your knowledge and time isn't free.
You'll have a cost in time to develop and test your solution, but the biggest cost is ongoing support of that solution you've made.
When things go wrong, who will you call?
How much time will you spend making sure the free solution remains functional and up to date with Microsoft and your business process needs?
Then, what happens to the business when the person who made the solution and knows how it works leaves, and then it breaks?
Implementing in-house created solutions, although ingenious, can leave businesses exposed to significant risk if you're not fully set up with a dedicated development practice to support them.
Often this is a risk businesses aren't willing to take and they look for off-the-shelf solutions that can deliver what they need.
If you do want to create your own automation tool, then we would recommend you look at Microsoft MVP Martin Heusser's Teams Phone Number Management tool.
- https://heusser.pro/p/teams-phone-number-management-on-a-budget-e25d53f65caf
- https://heusser.pro/p/teams-phone-number-management-list-part-2-b5385e348a3a
- https://heusser.pro/p/teams-phone-number-management-list-part-3-e083a320004d
Deep Dive into Callroute's Teams Provisioning Solution, Orto
Orto by Callroute is a Teams Phone number management and automated provisioning solution. Built in the cloud as a SaaS application, Orto requires no installation and minimal Microsoft Graph API privileges making it easy to deploy into any organization.
It integrates directly with your Entra ID and Teams tenant to automatically provision Teams user configurations and phone numbers to users that need them.
Orto follows best practice provisioning methodologies and was built as a Teams-first application. This gives it a competitive edge verses other phone number management tools that were built for a different system and refactored to support Teams.
Orto Features
Orto is packed full of useful features for the Teams Phone admin:
- Microsoft Single Sign-On
- Role-based access
- Automatic number range creation
- Bulk uploading of numbers
- Number categorizations
- User persona creation and management
- Automated assignment using condition-based rules
- API access to ITSM platforms
- Microsoft licensing assignment
- Call queue assignment
- Teams team membership assignment
- Hold / reserve / quarantine numbers
- Change audit tracking
- Alerting and reporting
- Multiple Teams tenant support under one admin tenant
Microsoft Single Sign On
Orto allows you to authenticate using your own Microsoft 365 admin credentials. This means you can control access to the system using your own security principles from your tenant.
When setting up, you're able to select which authentication domains within your tenant will be allowed to sign in to the Orto portal.
You can then match the user account to the appropriate roles for administration.
Orto supports elegant onboarding for single sign on accounts. This means you don't have to pre-create the admin account prior to signing in with your Microsoft 365 credentials.
When you sign in for the first time, your account will enter a pending state which gives you no access to the portal features. An existing admin of Orto will need to approve and grant you appropriate roles for you to access the portal.
You also have granular control over authentication methods for each account. You can force single sign on for a user or you can enable dual authentication where the account is also permitted to sign in with an Orto controlled identity that can also be enabled for two-factor authentication.
This is useful for a break-glass situation for when the Microsoft authentication service is offline.
Role-based Access
Out of the box, Orto has built in roles you can assign to admin users from read-only to full administration.

You can also create your own roles to grant access to features specific to each of your admin use cases.
Number Imports
The first time Orto syncs with your Teams tenant, all your Microsoft and Operator Connect numbers are imported and organized into ranges.
Ranges are created based on country, area code, type, and operator label. This means that numbers within the same country and area supplied by different operators will be separated.
This avoids potential number assignment failures due to incompatibility. For example, trying to assign a Microsoft number to an Operator Connect user. It also helps you re-organize numbers when it comes to number porting.
Current number assignments are also synchronized, so you have instant visibility on how your ranges are currently used.
For Direct Routing numbers, these can be added in bulk using a CSV import. Building Direct Routing number ranges automatically isn't accurate as Teams lacks the intelligence to understand the entirety of these number ranges, only what is assigned.
Orto will automatically synchronize number assignments and inventory with Teams every hour. Any change to numbers and their assignments are picked up without your involvement. This ensures that Orto remains accurate to what is implemented in Teams.
As an admin, you can also manually trigger a sync at any time.
Change Audit Tracking
Each time a number assignment changes, Orto will log and audit the change. As an admin, you can see the complete history of who was assigned a number.
When the change was made by a user in Orto, or systematically by Orto, you'll also be able to see who made that change.
This enables you to provide a level of accountability and recoverability if an incorrect assignment has been made.
Hold / Reserve / Quarantine Numbers
Sometimes you'll need to reserve a number for future use, whether that's while you seek the necessary approval to assign, or they're a special number you want to reserve for a specific purpose and don't want it issued incorrectly.
This becomes an important feature when automating number assignment because systematic assignment doesn't discriminate when it's asked to find the next available number.
Likewise, when it comes to the unassigning of a number, sometimes you'll want to hold this number in a recycle bin / quarantine in case it needs to be reassigned to the same user. For example, if they leave the business, but return a few days or weeks later.
With Orto you can set the default quarantine time from hours to months. It will store the last known assignment of the number so if you do need to reassign it, it's simple to find the appropriate account.
When in quarantine, the number will be excluded from any automated or manual number selection criteria and is clearly labelled in the user interface for all admins to see.
Number reservations are also possible with Orto. You can perform a quick reservation if you need to protect a number from being used elsewhere while you process a ticket, or you can create a permanent reservation with custom labels.
This is useful if you have non-Teams devices assigned to some numbers within your range.
Number Categorizations
Categorizing numbers is important to ensure that the right type of numbers are assigned to the correct use cases. They also help to ensure efficient use of your number ranges as a whole.
You may need to categorize a sub-block of numbers within a range to a specific use case like sales, or customer support.
Categorization makes it easier to find the numbers you need for a business purpose and helps to ensure standardized processes are followed.
Orto supports two categorization methods:
| Categorization | Examples | Description |
| Tags | Service type: user, attendant, contact center, queue, whatever you choose to create. Number memorability: platinum, gold, silver, bronze Use case: sales, support, finance | You can assign up to 10 tags to each number. You can create your own tag taxonomy. These can be color coded so they're easier to identify. |
| Locations | Manchester London Glasgow | You can create custom containers to associate numbers with. Locations can contain numbers from any range, so you can mix Direct Routing, Operator Connect, and Calling Plan numbers into a location container from any area code. |
User Persona Creation and Management
User personas are the best way to ensure consistency in user provisioning. Orto synchronizes with Teams to discover all the user policies you have created.
You can then create a user persona for each use case and associate the relevant policies to that persona.
Orto personas then take it a step further and allow you to associate number ranges, locations, and tags with each persona.
When these personas are associated with a number range criteria, and when a user gets assigned that persona (and licensed with Teams Phone), they will be automatically assigned the next available number in the relevant number range.
This is an important distinction verses using Teams Group Policy assignment to assign policies and manage personas. With that method, the number assignment is still a manual step that requires either PowerShell script or TAC interaction.
Using Orto, you just need to assign the persona, and Orto will do everything including assigning the phone number.
Automated Assignment Using Condition-based Rules
The power of Orto really shines when you use its automation. With Orto Pro, you get access to the automated provisioning feature that allows you to create provisioning rules that will automatically trigger when a new user is found in your Entra ID.
Here you can use Entra ID user attributes like department, city, job title, custom attributes, and even group membership to create conditions that trigger an automation rule.
Within the automation rule you can assign the user their required Microsoft licensing, Teams user persona (which may include a phone number), team memberships / ownerships, and call queue agent assignment.
Orto will automatically synchronize with your Entra ID every hour and process new users through these rules. When they match a condition set, the associated rule and its provisioning configuration is applied to that user.
Rules can be made explicit where once a user matches that rule, no other rules are processed for that user, or they can cascade.
Cascading rules allow you to reuse certain rules for multiple use cases, like your baseline configuration, then site specific, and then have more specific rules for a job function for example.
As the user is processed through each one, they will end up with their desired configuration to match their use case and you, as an admin, have a simpler rule table to manage.
API Access to Integrate with ITSM Platforms
You may need to ensure approvals or compliance processes are followed before assigning a Teams Phone license or phone number to a user.
This can be done in your existing ITSM platform, like ServiceNow.
Orto Pro comes with an open API that you can use to inject into your ITSM automated workflow management module.
Using the API, you can send Orto a provisioning request once you've attained the necessary approvals.
Orto will then process that user and return a completion status that your ITSM platform can process to complete its task and close the ticket.
The API also allows you to migrate users in bulk to Teams. You can send user data to the API endpoint and Orto will enable Teams and assign their phone number to their account for you.
Microsoft Licensing Assignment
Not every business has purchased E5 licenses. Teams Phone (and optional calling plans) are add-on licenses that have been bought for a subset of users that need Teams calling.
This means that when a user needs Teams calling, you must first assign them the appropriate licensing.
When you do this, Microsoft back-end provisioning will enable Teams Phone capabilities for the user. However, this can take anywhere from a few minutes to 24 hours to complete.
To combat this, when using Orto, you can create licensing groups that contain the pre-requisite licenses to assign. You can then associate these with a provisioning rule. When a provisioning request is made, Orto will assign the licenses within the group to the target user and wait until license activation has completed, then automatically move on to complete the policy and number assignment required for the user.
This means you don't have to wait around for licensed features to become activated, it's assign and forget.
Call Queue Assignment
If you use PowerShell, agent management becomes difficult as there isn't a way to add or remove a single user to the agent attribute array. You must first transpose all current agents into memory, manipulate the data, and then commit it back to the queue object.
If you get that wrong, it'll cause significant disruption to your users and/or customers.
Orto removes this potential disruption with its ability to assign users as agents to multiple call queues at once. Rather than you using the TAC to assign a user to multiple queues, or adding them to multiple Entra ID security groups, Orto will do this for you.
You can group queues together and then associate them with provisioning rules so that the required users are added to all their necessary queues at once.
Alerting and Reporting
Orto allows you to create number range availability thresholds either tenant wide or on a per range basis.
When these thresholds are near capacity, you'll receive an email informing you that a range is at risk of becoming fully utilized. You can then take proactive measures to ensure your provisioning processes don't fail.

Multiple Teams Tenant Support Under One Admin Tenant
Large enterprises that have multiple operating companies may have individual Teams tenants for each organization but implement IT shared services from the parent corporation.
If you're working in such an organization, you'll know that administrating multiple tenants is a bind even with delegated cross tenant authentication.
With Orto, you can connect as many Teams tenants as you like. When connected, you can manage your Teams provisioning centrally, simplifying your administration processes.
Licensing
You can choose from two Orto licenses:
- Orto Standard: Includes all features except automated provisioning and API access. Orto Pro: All features plus automated provisioning and API access.
Licenses are purchased based on the number of managed Teams users.
Orto defines a managed user as follows:
"A user who has a Teams license assigned and has been assigned at least one of the following Orto features: a persona, a license group, a call queue group, a team group, or a phone number".
This means that if you have 10,000 licensed Teams users in your Microsoft 365 tenant, you only pay for the users you manage using Orto.
Prices of licenses start from $0.85c per user, per month basis, billed annually in advance. Two-to-five-year deals are also an option for security of price and discounts.
Overuse is permitted within 1% of the overall purchased amount. You won't be penalized if you exceed your purchased quantity within reason.
How to Deploy Orto
Orto is a cloud-based solution that requires no servers, Azure services, or software installation in your environment.
When your Orto tenant is created, you'll need to authenticate your Microsoft 365 tenant using your admin credentials. This will register an enterprise application so application-based API consent can be granted.
The permissions you need to grant Orto are unintrusive and least privilege.
Once consent has been granted, Orto will connect to your Entra ID and Teams tenant and start synchronizing your users, policies, and numbers.
Depending on your tenant size, this can take between two minutes for smaller organizations and two hours for tenants of 30,000 users or more. This process happens in the background, so you can come back later.
Automating Teams Phone Using Orto
Now we will look at what it takes to create automated Teams Phone provisioning with Orto. To demonstrate this, we're going to be creating provisioning rules for three use cases.
| User Persona | Configuration |
| Manchester Based HR Workers | Will have default Teams experience plus: A phone number from Manchester Range with tag of HR Manchester Dial Plan HR Main Caller ID policy |
| London Based HR Workers | Will have default Teams experience plus: A phone number from London Range with tag of HR London Dial Plan HR Main Caller ID policy Agents of the sickness call queue |
| Glasgow Based Sales Executives | Will have default Teams experience plus: A phone number from Glasgow Range with tag of Sales International Calling Glasgow Dial Plan Agents of sales inbound call queue Members of the sales team |
Connect Your Teams Tenant
Firstly, you'll need to connect your Teams tenant to Orto. You can do this using your admin credentials for Microsoft 365.
Go to Services > Connect a Service and click Connect on Orto.
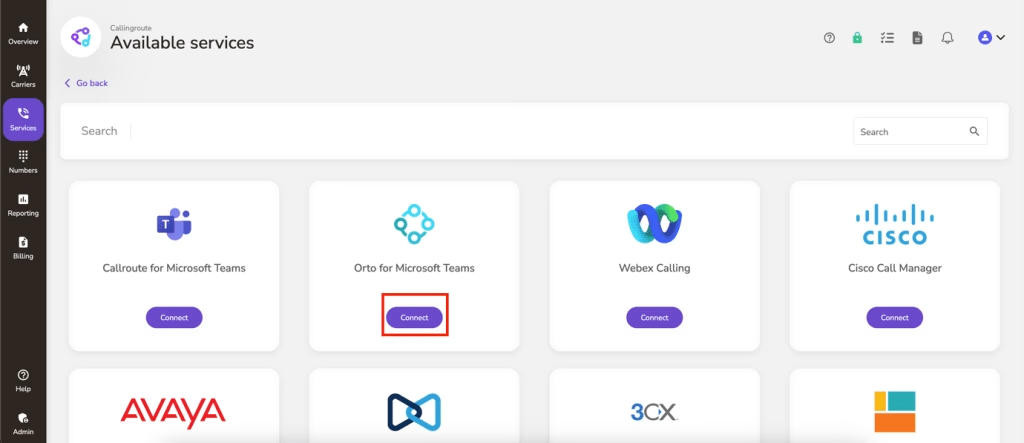
Click on Authorize to sign into your tenant and provide the API consent required.

Check the box to consent to the API permissions request and then press Accept.

You'll then be prompted to configure the Orto enterprise app into your Entra ID tenant for authentication and access permission.
Sign in again with your admin credentials to consent to the PowerShell API.
Orto will then configure and sync all your users, Microsoft licenses, Teams policies, queues, and teams. When it's complete, you'll be presented with your user management screen.
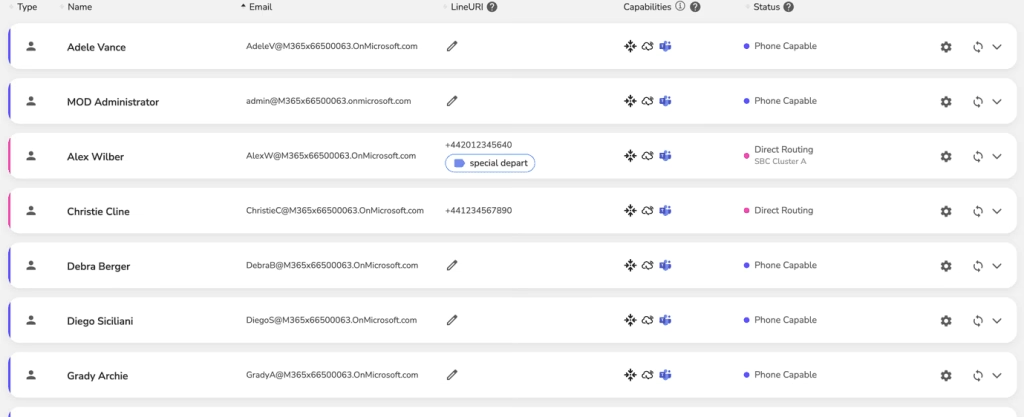
Sync and Create Your Number Ranges
If you're already using Operator Connect or Microsoft Calling Plans, your phone numbers will automatically be synchronized from your Teams tenant into Orto. They will be shown under the Numbers section.
If you're using Direct Routing, you'll need to upload your number ranges using the CSV template in the portal.
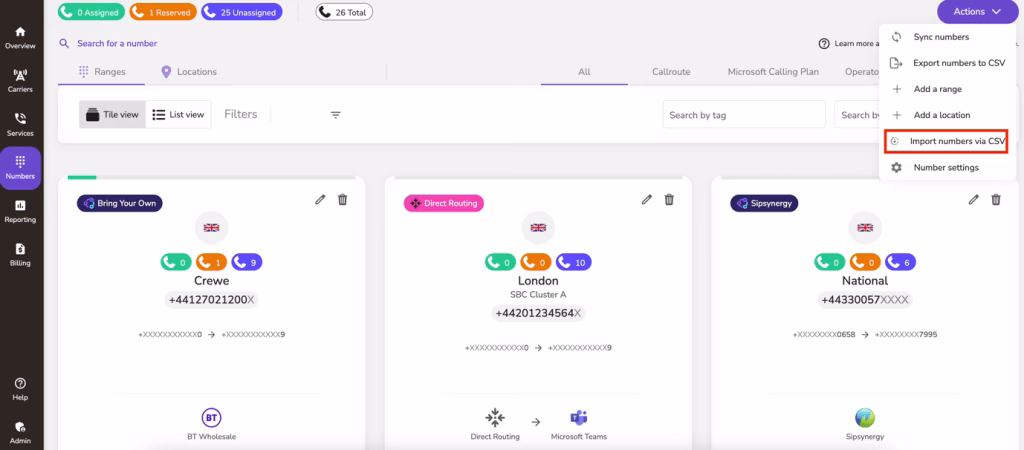
Ranges are built using the following logic:
- All numbers of the same number type (Calling Plan, Operator Connect, Direct Routing), then by carrier name, then by country, then by area code.
This ensures numbers in the same area code, hosted with different operators, don't get mixed. This helps maintain service continuity and ranges are easier to port, add to, or remove as needed.
Tagging Numbers
You can tag numbers with labels as part of the import process. Alternatively, you can apply tags as needed to numbers in the portal.
Tags allow you to label numbers for a specific purpose. In our examples, we want to tag numbers as HR and Sales so we can assign the correct number plan to users determined by their business role.
You can do this on individual numbers by expanding the number row and then clicking on Edit Tags.
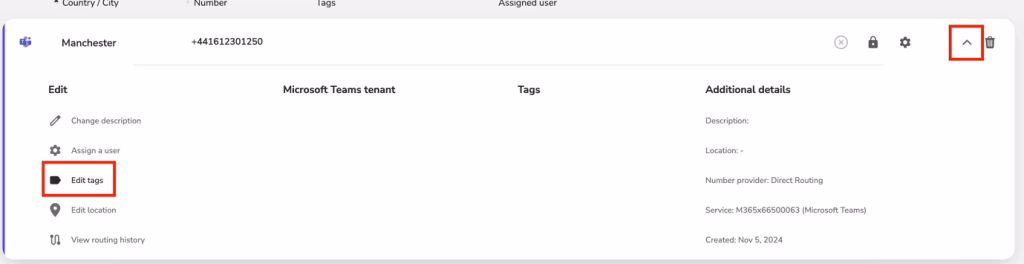
Enter the tag name and press the + icon and then Save.

Repeat for all other numbers.
You can filter the number list by your tags too. Here you can see we have three numbers tagged for HR in both the Manchester and London number ranges.
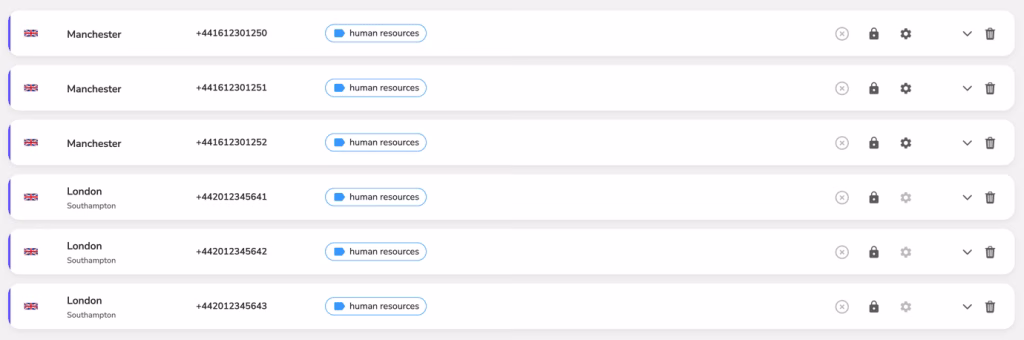
You can bulk update numbers with tags by exporting your ranges to CSV, editing the tag column to include the tags you want to apply, and re-importing the CSV to apply those changes.
Locations
Tagging alone sometimes isn't enough. In our example, we have a HR department split over two offices and we want the HR users to be assigned a local office number that is part of the HR numbering plan.
To enable this, we can use the locations feature.
Locations allow you to create a collection of numbers that are for use within a similar geography. In this example, the geography is a site location, but a location can be anything you determine.
A location can contain numbers of different types (Calling Plan, Operator Connect, or Direct Routing) and multiple tags.
To create a location, click on the Actions button in the numbers section and press Add a Location.

Give your location a name. In our example, we're going to create three locations: Glasgow, London, and Manchester.

You can view your created locations using the locations tab in the Numbers section.
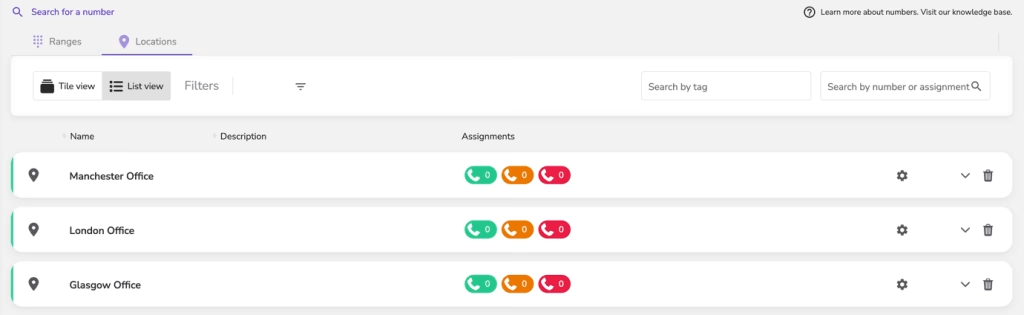
Now we need to assign the numbers to the locations. We can do this in bulk by going to each number range and multi-selecting the numbers we want to assign to the location.
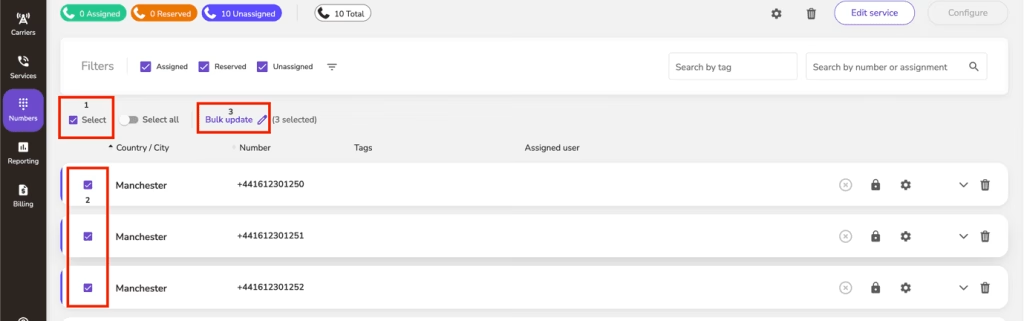
Now we've added our numbers, tagged them, and assigned them to appropriate locations, we can build our Teams user personas.
Create Your User Personas
A user persona is a collection of common Teams policies that can be assigned to users of similar roles.
Unlike the native Teams group policy assignment method, Orto will also automatically assign the next available number defined from a range or location criteria to the user that matches the persona.
This removes the manual step needed by IT admins during the provisioning of Teams Phone. You can also create a persona without a number range, if you don't wish Orto to assign the next available number automatically.
Head over to Services > Orto > User Personas.
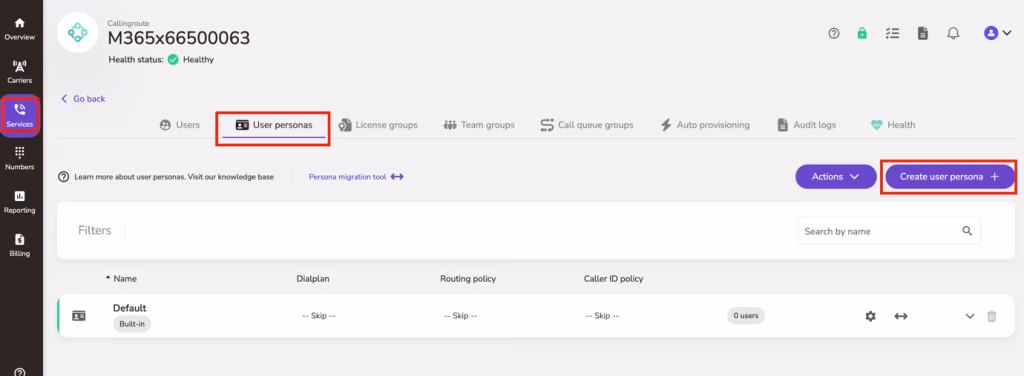
The default persona can't be edited.
Now we're going to create a user persona for the three groups of users: HR London, HR Manchester, and Sales Glasgow.
For HR London, we need to select the London dial plan, domestic UK calling voice routing policy, and the HR UK global pilot Caller ID policy. Then we need to select the London office location for the number range, and the Human Resources number tag.


Click Create to create the persona.
Now we need to repeat for the HR Manchester persona. But this time, we need to assign the UK Manchester dial plan, domestic calling UK voice routing policy, HR Global UK Pilot Caller ID Policy, and numbers tagged Human Resources in the Manchester location.
Once this is created, we need to create one for Sales in the Glasgow Office. This time we're giving them international calling capabilities and a number from the Sales numbers in the Glasgow office location.

Your personas should now look something like this:

Note: When policies in your persona are set to –skip– this means that Orto won't change any policies that might be applied to users in the associated policy type.
Create Your Licensing Groups
You can also provision Microsoft licenses to users using Orto. You may do this already with group-based license assignment in the Microsoft 365 admin center.
However, the Teams Phone Standard license might be an add-on reserved for users who specifically need Teams Phone capability.
If this is the case, you may want to use Orto license groups to apply this license to users who are being enabled for Teams Phone through automated provisioning.
Using Orto license groups, you don't need to pre-assign the Teams Phone license before using the power of Orto. Instead, Orto will assign the license, wait for activation, and then proceed to assign the user their persona, phone number, and any associated configurations such as call queue memberships.
Head over to the License groups tab in Orto and Create a License Group.
In this group, select the Teams Phone Standard License from the available licenses, and press Create.
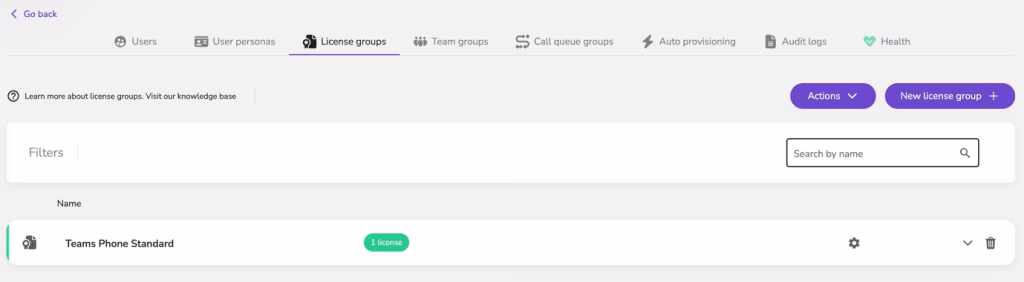
Create Your Call Queue Groups
Managing memberships of call queues can be an arduous admin task. In some departments like sales, users could be agents of several department queues.
In the TAC, managing agent membership is done on a per queue basis. If a user needs to be added to 10 queues, you've got to edit all 10 queues and add them to them individually.
You can simplify this using group-based membership, but that could also mean adding the user to 10 different Entra ID groups.
With Queue Groups in Orto, you can group queues together into a logical unit. Then assign the Orto queue group to a user and they will be added as an agent to all queues within that group.
This works for direct agent, group-based, or voice enabled channel membership options.
In our example, we want to add the sales users to the sales queue and the London HR team to the HR sickness queue, so we can create two queue groups.
From Orto, go to the Call Queue Groups tab and click Create Queue Group.
Create one for sales and select the sales queue.

Then create another for the HR department and add the HR sickness queue to that group. The result should look something like:

Create Your Teams Team Groups
Orto also allows you to add users to teams in Teams as members or owners. This is useful when provisioning users with the correct access to the teams they need from day one.
Like queue groups, team groups allow you to bundle together teams that users should be members of by role, location, or other delineating factors.
As we need to add the sales users to the sales team, we can create a team group for this.
Go to Orto, then Team groups > Create team group.
Give the group a friendly name, e.g. Sales teams, and select the required teams from the builder and press Save.

Whether users are added as owners or members is a decision made at the point of assignment.
Create Your Provisioning Rules
Now you've created your numbering plans, personas, queues, licenses, and team groups to support your provisioning standards, it's time to build automation.
Before we jump into this, it's important to understand that all these configuration items can be applied to users individually via the Orto portal by you, the administrator.
But as we're evaluating the autonomy of provisioning, we want to see how easy it is to automate end to end Teams provisioning using Orto.
Orto achieves this by using provisioning rules. These rules work like Power Automate flows. E.g. "if input conditions match, then do something here…"
Orto conditions use Entra ID user object attributes or security group memberships. This means you can define a provisioning rule based on a user's Entra ID account properties and / or security group membership.
When they match the conditions, Orto will apply the desired configuration associated to the provisioning rule.
By default, auto provisioning is turned off, but it can be enabled when you're ready.
In our examples, we want to create three rules that apply the correct Teams experience to users.
| User Profile | Configuration |
| HR London Users | License groups: Teams Phone Persona: HR London Queue groups: HR queues |
| HR Manchester Users | License group: Teams Phone Persona: HR Manchester |
| Sales Glasgow Users | License groups: Teams Phone Persona: Sales UK Queue groups: Sales queues Teams groups: Sales teams |
To identify the user types, we're going to be looking to match conditions based on their user account properties in Entra ID as follows:
- Country
- City
- Department
Go to Orto, then Auto Provisioning tab and then New Automation.
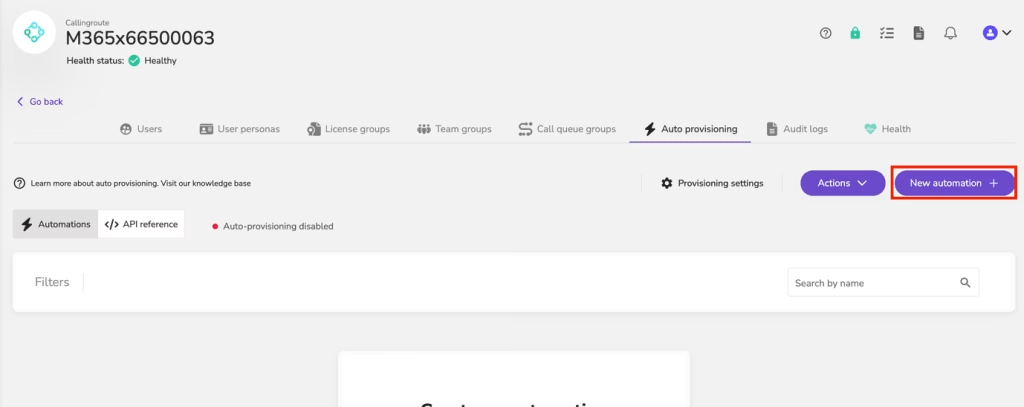
The first rule we're going to make will look for HR London users and apply the desired configuration.
Name the rule appropriately and choose the usage location for the users who will be associated with it.
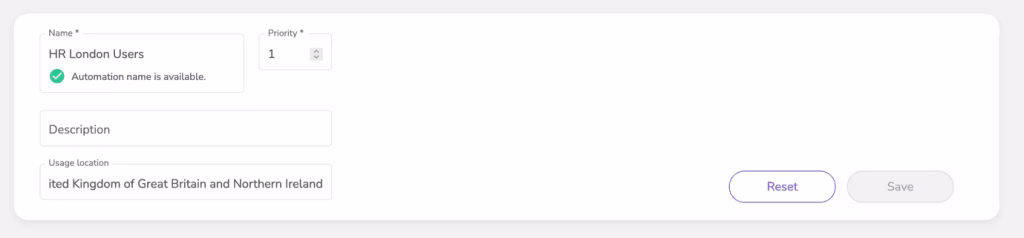
Now, we need to create the conditions to match the rule. We need three conditions:
- Country == "UK"
- City == "London"
- Department == "Human Resources"
You can choose other condition operators like 'begins with', 'ends with', 'contains', 'not equal' and the values are case insensitive.
Now we've created the conditions, we need to assign the configuration. We're going to assign the following:
- License Groups: Teams Phone Standard
- Persona: HR London
- Call Queue Groups: HR Queues
Then press Save.
Now we're going to repeat the process for the HR Manchester users, but this time create the matching conditions as:
- Country == "UK"
- City == "Manchester"
- Department == "Human Resources"
The apply the following configuration:
- License Groups: Teams Phone Standard
- Persona: HR Manchester
Finally, we're going to create a rule for the Sales users in Glasgow using the following conditions:
- Country == "UK"
- City == "Glasgow"
- Department == "Sales"
And then apply the following configuration:
- License Groups: Teams Phone Standard
- Persona: UK Sales
- Call Queue Groups: UK Sales
- Team Groups: UK Sales (as members)
Now you have the provisioning rules created, they're good to turn on. Click on Provisioning Settings and toggle on auto provisioning.
Out of the box, rules will automatically run every hour. When a user matches a rule, they will get the prescribed experience of that rule.
If the rule is set to cascade, then the combined configuration of all matched rules for that user is applied at once.
Using the Orto API
Orto Pro also includes an open API. You can use this API with your ITSM system to create approval workflows to trigger provisioning jobs.
The API can be triggered even with Auto Provisioning disabled so you can situate Orto behind your IT service catalog and only trigger it when the correct processes have been followed.
Use the API if:
- Your Entra ID user properties are unreliable. You can supply the correct condition values in the API request to trigger the appropriate rule. This is useful if your provisioning request is triggered from your HR system rather than AD.
- You can't use condition-based matching. You can create condition-less rules that apply a configuration then use the API to provision a user against a specific rule.
- You need to assign a specific number to a user. You can use the API to override automatic number selection and assign the required number to the user alongside the standard Teams policy experience for them.
- You're performing a migration from your PBX to Teams. You can use the API to move users in bulk over to Teams keeping their existing number.
Full Orto API documentation is available here: https://api.callroute.io/documentation
Delegate Admin Access For Scalable Provisioning
Once your provisioning rules are defined, the next challenge is deciding who manages what. This is especially important in larger or multi-site deployments. Without clear boundaries, provisioning responsibilities can become centralized, slow, and error-prone.
While Microsoft's admin roles provide broad tenant-level access, they lack the flexibility to delegate provisioning tasks by region, department, or persona. This makes it difficult to empower local teams or business units without overexposing control.
Orto simplifies this by letting you delegate provisioning responsibility to specific groups or teams using Granular Roles-Based Access Control. Whether it's enabling your HR team to manage call queues, letting regional IT leads oversee local number assignments, or ensuring help desk teams can provision without PowerShell, Orto aligns admin access with real-world team structures.
First, create a Security Group to configuure access to MS Teams uses and numbers. Examples of these security groups could be APAC, Great Britain, and The USA.
Next, assign admin users to these groups. In this example, we are adding the user 'USA Admin' to 'The USA' Security Group. Do the same for adding the phone numbers to this group.
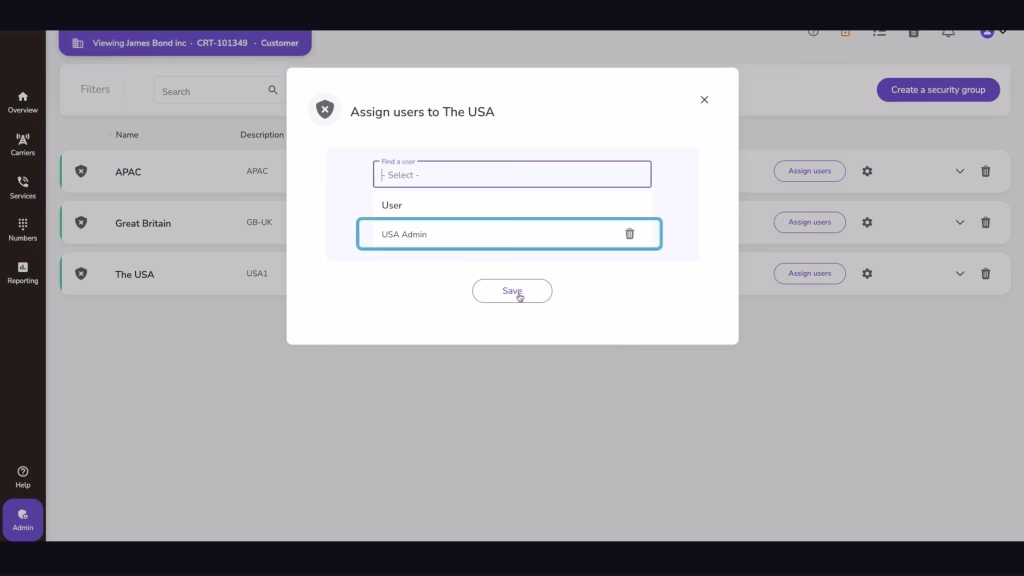
Then use the automated provisioning feature to build rules that associate Teams users with your Security Groups. You do this by using the EntraID attributes of the users, for example country = USA.
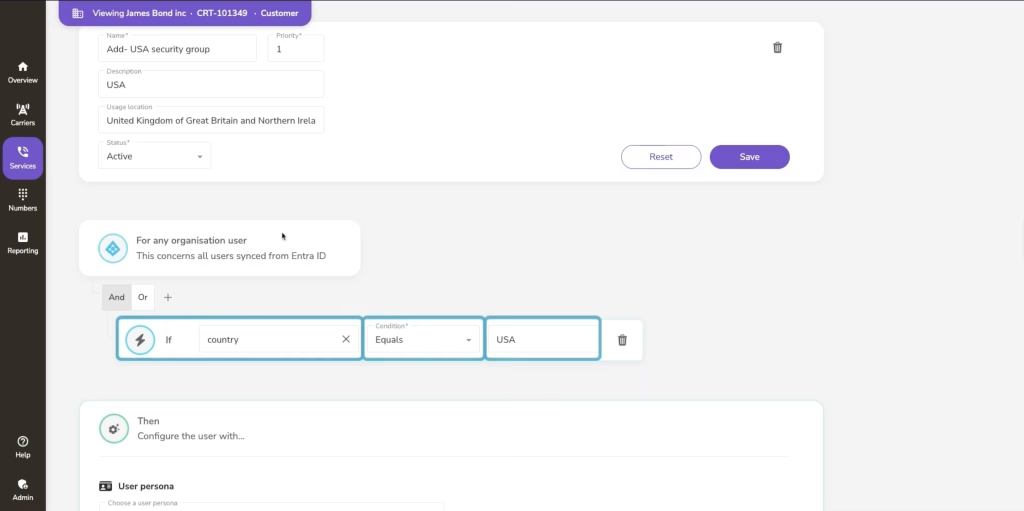
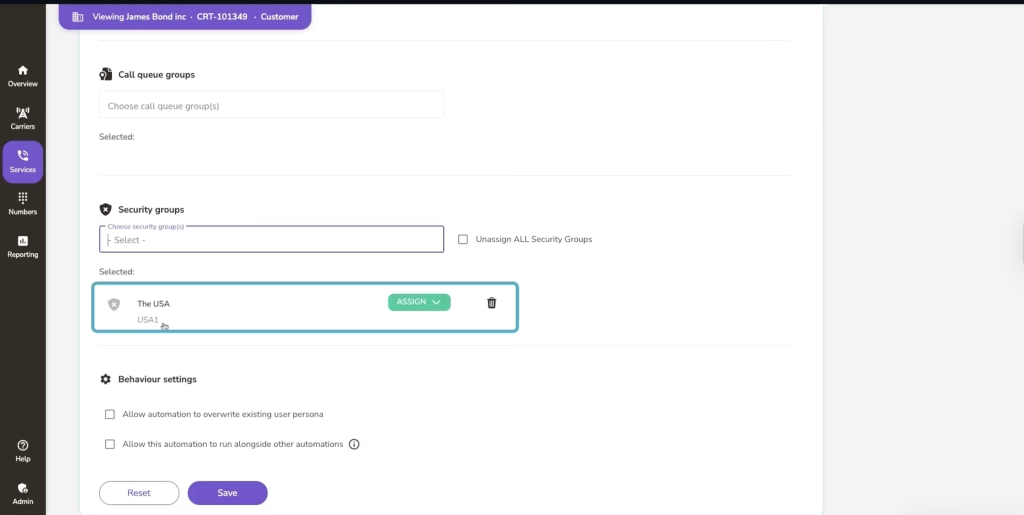
This means when your admins log into the Callroute portal, tey will only be able to see and manage the numbers and users within the Security Group they are assigned to.
Support and Maintenance
Callroute provides 24×7 P1 telephone support for all customers, giving you peace of mind that if things go wrong, you can get the help you need.
There are routine deployment updates in Orto on a bi-weekly basis, so you don't have to wait long to benefit from new features or bug fixes.
Orto is highly available, up to 99.99%. This allows deployment updates with no downtime or impact on customer functions or access.
Conclusion
Out of the box, Teams offers the IT admin just enough building blocks to manage a Teams Phone environment.
However, for them to manage the environment effectively, they will need to create potentially hundreds of provisioning security groups in Entra ID that each apply a different Teams policy set.
In addition, they'll need to create their own processes, documentation, scripts, and automation to assign users to the correct groups, assign phone numbers, and add them to call queues.
Keeping on top of all these to ensure the process continues to operate effectively at both human and computational levels is a time and knowledge investment.
As knowledge and expertise leave the business, it can leave IT vulnerable to operational breakdowns. When these occur, it can take days, weeks, or even months to find the root cause and then implement a suitable fix.
In the meantime, operational exceptions or workarounds are used and adopted as new practices that reduce the effectiveness of your team, accuracy of provisioning, and overall productivity.
Left unsolved, you'll end up with a Teams deployment that is unmanageable. For these reasons, it's important to consider implementing technology that allows you to continue to implement operational standards even if key people leave your business.
Businesses need the reliability, consistency, and efficiency of automated programmatic provisioning for Teams to maintain their competitive edge.
Implementing a provisioning tool like Orto into your Teams administration makes a lot of sense. Even from a cost perspective, the solution is paid back within a few months of implementation.
Ready to master Teams Phone provisioning?