This is the story of a Microsoft Teams admin.
Let’s meet the main character: it’s you.
Every day, you make changes to different users in Teams. These range from basic adds to call queues, slightly more complex deletions of users, and the more complicated changes of department.
On the face of it, they all sound like they take the same time. It’s just a change to a Teams user, after all.
Except, you—the humble, patient, good-looking, Teams admin—know the truth.
What may seem like a simple user management task could take absolutely ages and have horrifying repercussions.
Okay, we’re being a little bit dramatic. But it’s relatable, right?
Every time you get a ticket to change something for a Teams user, three things happen:
- A new manual process begins, taking up time in your day.
- A change impacts what a user can and can’t do.
- There is the potential for something to go wrong, taking up even more of your time and stopping you from getting on with other project tasks and support tickets.
How do we get a happy ending in this Teams admin story?
Spoiler alert: introduce automation of Microsoft Teams user management tasks and get on board with auto-provisioning.
But nobody jumps to the end of a book. So, let’s start at the beginning and see how we got into this situation.
P.S. If you’ve already read this story and are looking for the sequel, check out Orto for Teams. It’s a friendly robot that tidies up your Teams admin stack and saves you a ton of time and money.
What is the role of a Teams user administrator?
In Microsoft Teams, there are many things an admin may be responsible for.
Here are some headline tasks:
- Provisioning new users
- Deleting the accounts of users who leave
- Deciding what happens to their content
- Adding users to new call queues
- Amending access to teams and channels
- Adding and deleting access to Teams policies
- Troubleshooting “support” issues
Ultimately, the Teams user administrator is the power-giver and taker-away of permissions and access. If a user or department wants or needs something they don’t have, they must approach their Teams admin (usually by way of ticket) and ask nicely with some kind of rationale for wanting this new functionality.
Sometimes, this might be as simple as toggling on a feature they already have access to. These usually happen in the Teams Admin Center (TAC).
For example, a user needs to join another team as they’ve moved departments. For them to be productive on their first day in this new team, the minimum requirement is they can access the rest of their team members and get updates on ongoing projects.
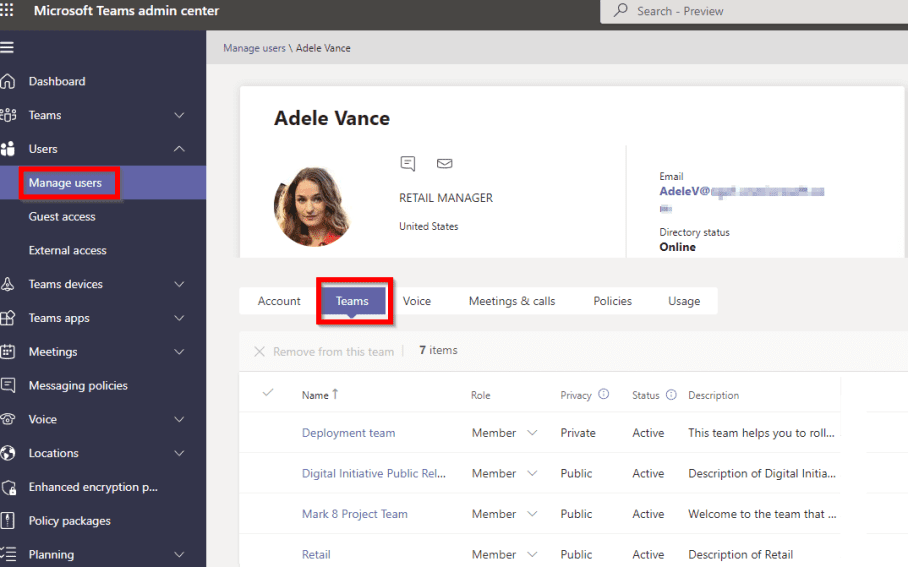
Other times, it could involve a license upgrade, the removal of content, or a change to an existing policy. The more complicated the request, the longer it takes.
The longer it takes, the more clicks we introduce. We also run the risk of moving information between systems and relying on manual processes like copy and paste.
One wrong step and 💥BOOM💥, we have to start all over again. Or, even worse, the user gets impacted and can’t work while we fix the problem.
Simple changes in the TAC might not be susceptible to these errors and their repercussions. But not every Teams task is that easy.
To adapt another story by a slightly more famous author to the Teams world, “All Teams admin tasks are equal, but some are more equal than others.”

How do I manage users in Microsoft Teams?
Okay, so we don’t want to lose time on major changes (or minor ones, really).
We don’t want to upset users by walking through each change with a fine toothcomb and rejecting them.
We don’t want to leave the door open to potential manual errors.
Side note: we are all going to make mistakes at some point. There’s no point fighting this. We’re all human and it’s in our DNA. As a former provisioner myself, I used to make tons of mistakes.
I documented my experience here: When I was provisioning a coordinator, I made lots of mistakes.
So, let’s not bury the lede here. We promised everything you need to know about Teams user management. So that’s what follows in the next few sections. We’ve split them up into categories of work you’ll find yourself doing rather a lot. There’s a “before and after” type scenario for each one.
We’re rather confident you’ll prefer the after version each time.
1 – Setting up new user accounts
The traditional way to set up new user accounts in Microsoft looks like this:
- You provide a new laptop
- You configure credentials for all the apps they need
- You provision a new Microsoft user on Entra (Azure AD)
- You add a PSTN number from an existing range
- You mark the ticket as complete
What follows is a myriad of support tickets over the next few days and weeks, asking for bit part functionality as the user discovers they don’t have it (and needs it).
If this happens every single time a new user starts, the influx of tickets becomes overwhelming. You’re spending all your time fighting priority tickets while expected to enable new features and policies for this new user who’s now arranging meetings left, right, and center, and needs them recorded and needs access to new channels and files. Oh, and they forgot to include that they would like voicemail turned on and is music on hold possible?
What you could be doing instead is automating the provisioning of new users using Orto.
How Orto streamlines Microsoft Teams account setup
Orto is so-called because Orto-matic. Get it? We’re talking about automated provisioning for Microsoft Teams.
Instead of the manual, click-by-click, script-by-script, painful process, you can create user persona templates. Once you have your set of templates, a new starter joins your business, and you select which they slot into.
When creating your new user’s Microsoft accounts using Entra (formerly Azure AD), all you need to do is select their user persona based on department, geography, or seniority.
Once selected, Orto does the configuration for you. You configure the Azure AD attribute and out comes a fully configured Teams account with the relevant permissions and policies needed for that specific job role.
Here are the policies we can automate assignment of, straight out of the box:
- App Setup
- Audio Conferencing
- Call Hold
- Calling
- Call Park
- Channels
- Compliance Recording
- Emergency Calling
- Emergency Call Routing
- Enhanced Encryption
- Events
- Files
- IP Phone
- Meeting Broadcast
- Meeting
- Messaging
- Mobility
- Room Video Tele Conferencing
- Shifts
- Survivable Branch Appliance
- Video Interop Service
- Voice Applications
- WorkLoad
- Meeting Branding
- Dial Plan
If you’re a Teams admin, here’s how your life could look:
The ROI of Microsoft Teams auto-provisioning is clear. You’ll save time, effort, and the cost of manual errors. Streamlining your Microsoft Teams account setup really should be a no-brainer.
2 – Assigning phone numbers to users
Before you can assign a phone number to a Teams user, a few things must already be in place:
- User(s) must be voice-enabled (Teams Phone)
- User(s) must have a calling method enabled (Direct Routing, Operator Connect, Calling Plan)
- You must have spare numbers available in your ranges, or
- Be okay with receiving new numbers from Microsoft (if you use Calling Plan)
The easy way to assign phone numbers in Microsoft Teams (at scale)
If you want to eliminate spreadsheets and time-consuming manual processes, you can replace them with a single pane of glass for Microsoft Teams management.
In the Orto portal, you can group all your numbers by location. This makes it easier to find specific ranges based on dialing code.
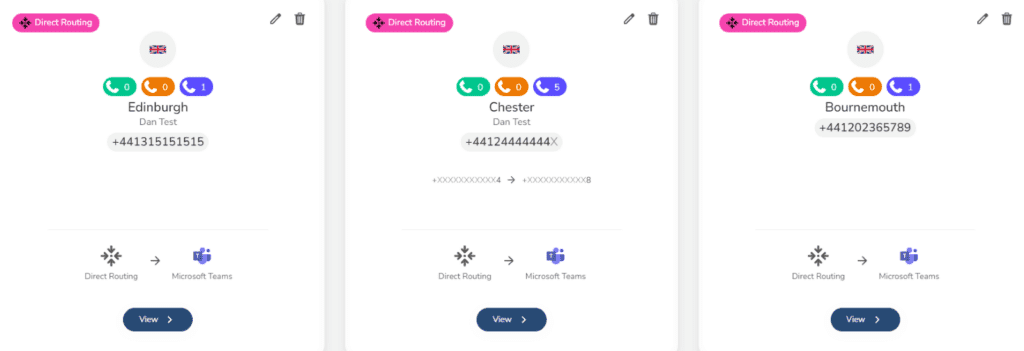
In the Teams Admin Center (TAC), for example, you get presented with all your numbers and must apply filters and perform manual searches when looking for specific ranges or numbers.
Inside each range, you can assign tags to denote what each set of numbers is reserved for. In the example below, see how obvious it is that these numbers are reserved for accounts.

To make it obvious to other admins, you can use the Quick Reserve option to lock the number from being assigned to anyone else accidentally.

When you click a number in the Orto portal, you can assign it to a user.
First, choose the service based on your phone system configuration. Let’s assume you’re using Microsoft Teams in this example (note you can integrate Teams with any PBX).
Select the service, choose the status, and the type of account you’re assigning the number to.
The process is the same when assigning a number to a user, hunt group, auto attendant, etc.
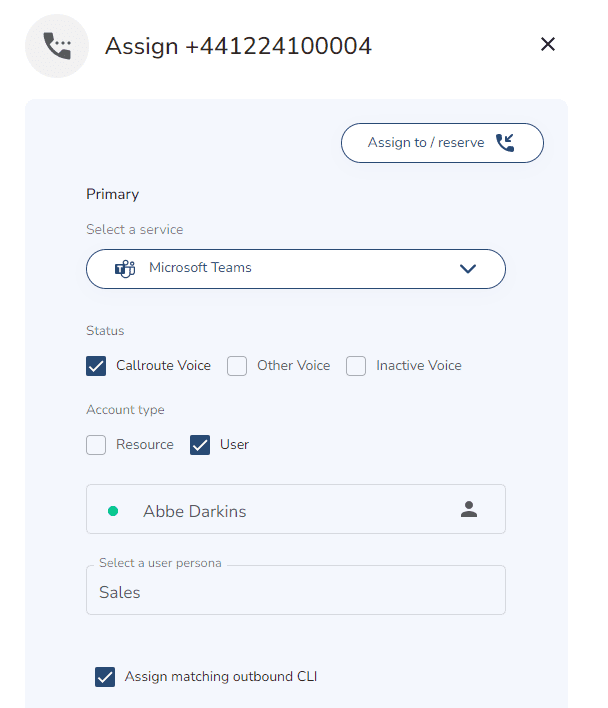
When you’ve selected the user who needs a phone number (Abbe Darkins), you can also assign them a user persona.
For example, if they work in Sales, this action grants them access to all the policies and features they’ll need for a typical Sales user in Teams.
Your final option in this view enables their outbound number to be displayed as their direct dial.
That’s it. Abbe now has a phone number and can start to make calls from Microsoft Teams.
Doing this one-off in the TAC may take the same amount of time, but you can’t assign user personas and you can’t reserve numbers quite so clearly.
When you’re doing this at scale, however, it gets messy as you return to a screen full of unsorted numbers each time.
3 – Managing team memberships
You could assign members to a team one-by-one like this:
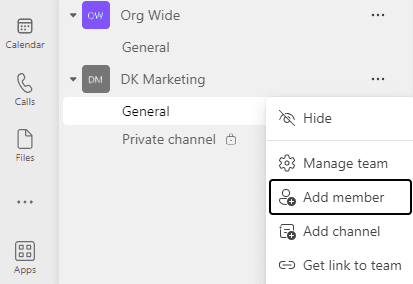
Or, in the spirit of automation and not rotting your brain, you could automate this process.
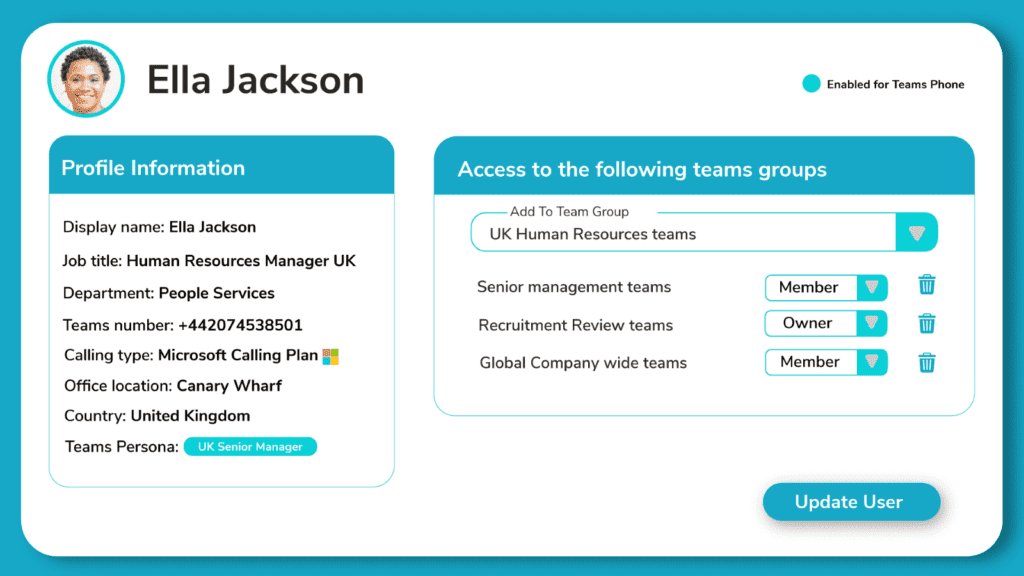
Using Orto, you can use team groups to group common teams together so you can easily add users.
For example, if the senior HR team all has access to the same 10 teams, it makes sense to group these together as an HR Teams group.
This way, you won’t have to go into each team and add users one-by-one or get tripped up running multiple PowerShell scripts every time a team needs new users adding.
Before you start, there are some pre-requisites:
- Must have signed up to Orto and connected your Teams tenant
- Must have the auto-provisioning license assigned
- Health check must be reporting a healthy status
- Must have at least one Microsoft Teams team created in your Microsoft 365 tenant
When you’ve done this, you must sync your Teams tenant with Orto.
Do this by clicking the Teams groups menu then hitting Sync teams.

Your tenant will start syncing and the button will reappear when complete.
Note: The sync of teams will only collect the Teams enabled groups found in your tenant. It will not sync the membership of these teams at present. To include newly created teams, please resync manually. In future, we plan to schedule this sync daily.
When synced, you can create your Teams group.
Click the New Teams group button, add a name and description.
Then use the Builder select all the teams you wish to become part of this Teams group.
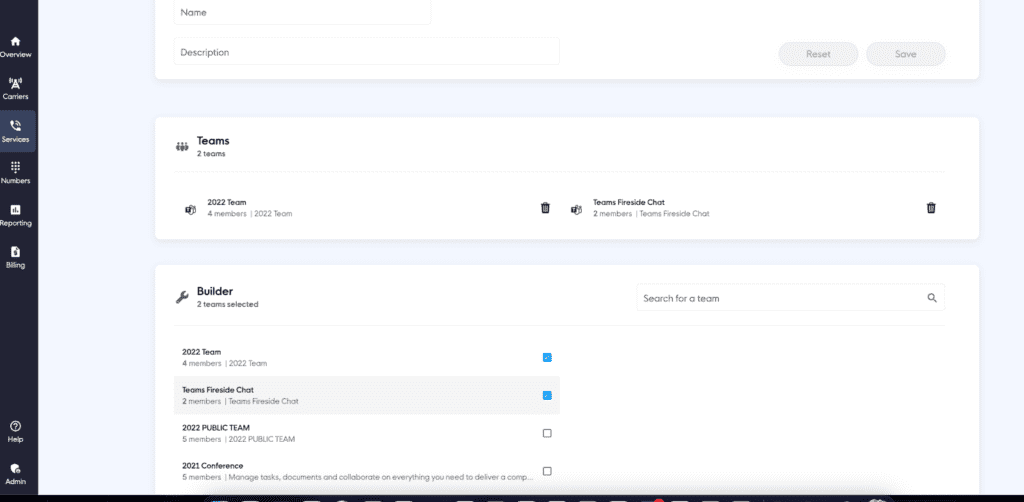
Click Save. You’ve just built your first Teams group!
Next up, we just need to add assign the Teams group to a user and they will have access to all the teams we previously selected.
You can do this in one of two ways using Orto:
- Manually
- Using auto-provisioning
To do this manually, simply find the user in Orto, choose the Team groups tab and select the team groups the user should be added to.
This user will have all the teams in that group assigned to them.
The second option is to let auto-provisioning remove that step when setting up your new user(s) for the first time.
Instead of manually adding users to team membership groups (like in the above process), you can create user persona templates for every time of user.
Say a new employee starts and they are in the HR team. They have also joined your business as a senior member of the team and need different access to a junior HR Manager. And they will be based in the New York office.
With this role criteria, we can pre-populate a Senior HR user persona.
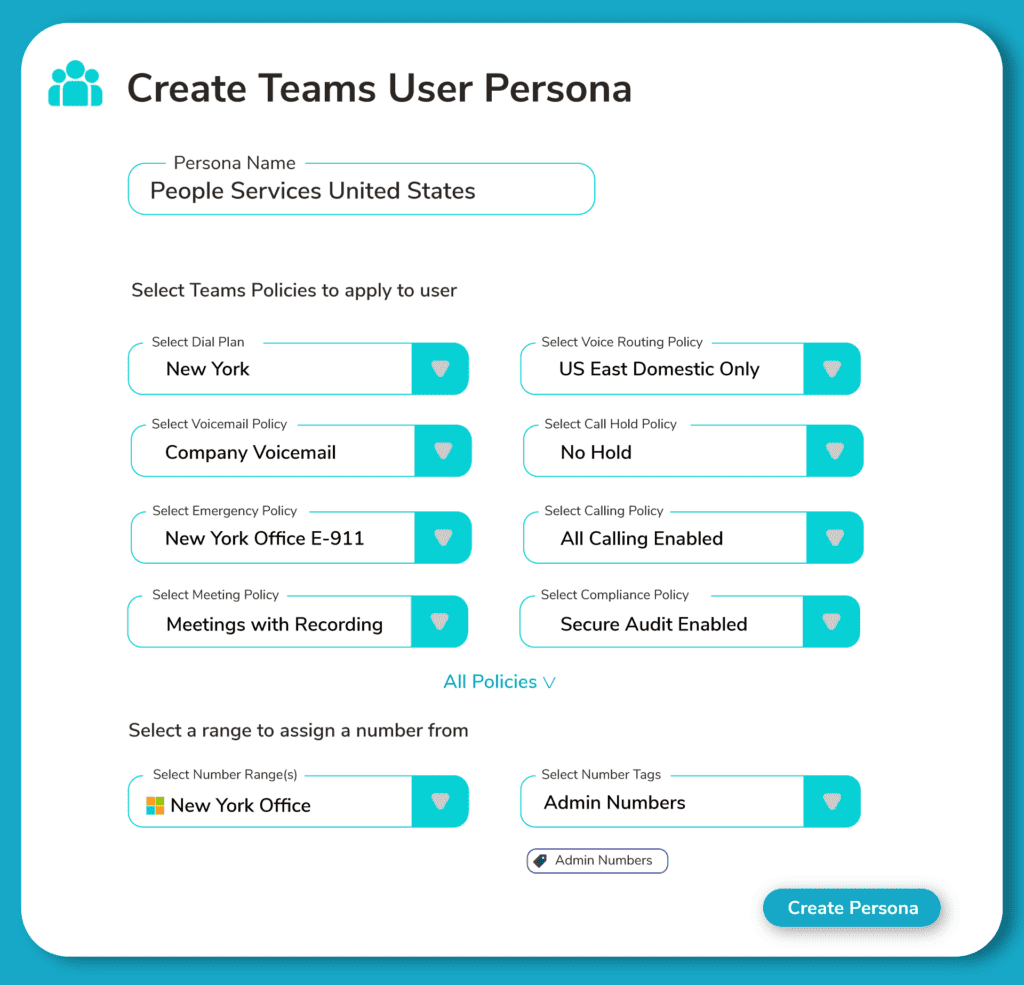
As part of that persona, you can include all team memberships associated with a senior HR function. This might be standard teams like #CompanyUpdates and #WaterCooler but it might also be #HRManagement and #HRPrivate.
Whatever the teams, group these together, associate them with your user persona, and when you add your new senior HR hire, they will automatically get access to all these teams when you configure their Entra ID and denote they’re senior HR.
4 – Assigning agents to call queues
If you need to do this once (and once only), you can do so in the TAC.
When you’re logged in, follow these steps:
- Select Voice on the left-hand menu
- Choose Call Queues
- Hit Add
- Name your queue according to department, caller type, or user behavior
If, however, you are likely to do this on a regular basis, i.e. you’re a Teams admin supporting an enterprise with many changes per day/week/month, you need a more scalable option.
How to use Orto for automated call queue assignment
Let’s start by showing you how to automate your Teams call queue assignments using Orto.
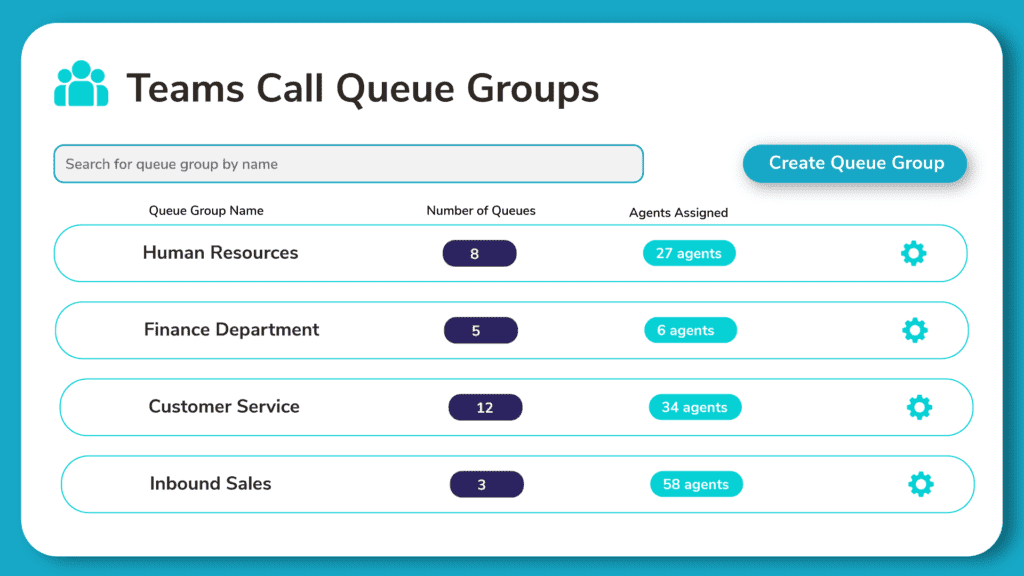
Create Queue Groups
To assign a number to a Teams call queue, you need to first create Queue Groups.
Queue Groups allow you to group together all Teams call queues that a department/group of users may need access to and bundles to assign to your users via Orto.
With unlimited call queues in each tenant, being able to assign users to the right queues based on their job role can be quite a challenge. The aim of Queue Groups is to allow admins to group common call queues together so that users can be added to these easily.
Pre-requisites
- You must have connected your Teams tenant to Orto
- Health check must be reporting a healthy status
- Must have the auto-provisioning license assigned to your Orto tenant
- Must have at least one Teams call queue created in your Microsoft 365 tenant
Creating a call queue Group
To create a call queue group, click New call queue group button from the call queue groups tab found in the connected Microsoft Teams service inside Orto.

Enter a name and optional description of the queue group and then use the builder to assign the required call queues to the queue group and press Save when finished.
Assigning a Queue Group to A User
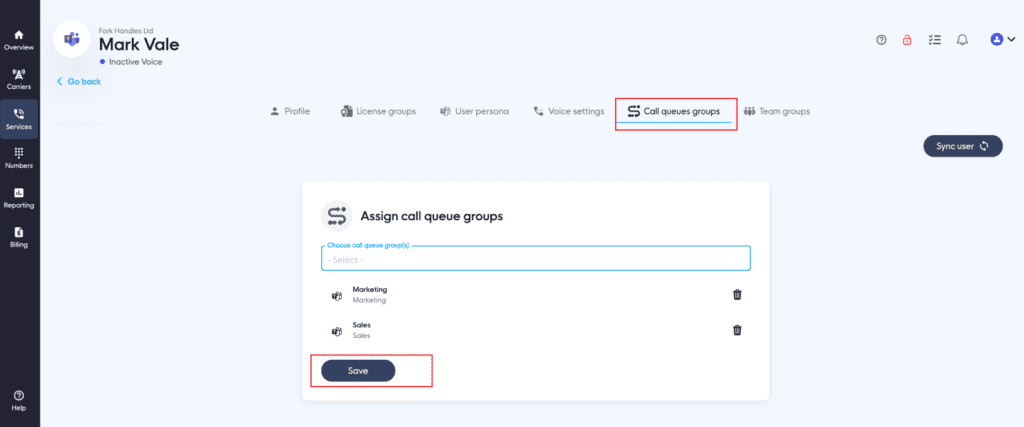
You can assign one or more queue groups to a user at any time. You can do this either per individual user or to a group of users using auto-provisioning. Edit the user in your Orto and click on the call queue groups tab.
From there select the queue groups to assign to the user and press Save.
Orto supports all call queue agent assignment methods that are available in Teams:
- Direct Agent Assignment
- Security / Distribution Group Agent Assignment
- Direct and Distribution Group Agent Assignment
- Voice-enabled channels
👉 Book your free Orto demo here.
5 – Assigning (and unassigning) policies to users
Manual policy management is time-consuming and conducive to human error.
Microsoft provides three ways to manage policies in Microsoft Teams.
- Teams Admin Center
- PowerShell
- Policy Packages
Teams Admin Center
You can use the TAC to assign policies to each of your users. While the user interface is relatively easy to use, the task of finding each user and then individually assigning policies to each one is a very time-consuming job.
The TAC is suitable for those one-time, quick changes to one or two policy settings for a user. It isn’t suitable for bulk changes like when 100 new users join your company.
PowerShell
Using PowerShell allows you to create your own scripts that can assign policies to several users. This has been the preferred option for many years to handle Teams policy assignments in bulk.
Although scripts are a useful tool for handling bulk changes, they are often created for very specific workflows and any deviation away from what the script is written to handle requires either modification or another script.
Scripts also rely on a consistent input source that must be formatted in a prescribed way, and this often consumes a lot of manual time to collate and format the input data for it to be ready to be passed to the script for execution.
Scripting is also a skill. And one that may no longer be within your team. Over time, scripts will malfunction as Microsoft updates Teams and PowerShell compatibility.
Policy Packages
Policy Packages is a Teams Premium feature that allows you to create a logical group of policies that work together to meet the requirements of the target user. In Orto, we call these User Personas.
Using Policy Packages, you can define a package that is suited to each type of user demographic within your company, be it sales, support, finance, etc.
Within each package, a certain policy from all the 38 different policy types in Teams can be selected that, when combined and assigned to a user, delivers their Teams experience.
The assignment of the package can be performed using the Teams Admin Center or by PowerShell.
Using Policy Packages within PowerShell allows scripts to become less complicated and easier to support without too much specialist knowledge.
However, you still require some scripting knowledge to keep your scripts up to date. But crucially, as this is a Teams Premium feature, to use Policy Packages each user assigned a package must have the Teams Premium License assigned.
If you are using Teams Premium for its other benefits, then Policy Packages is a great value add feature that gives you the opportunity to standardize and optimize your Teams policy provisioning.
But, as a standalone feature, the cost of the premium license often outweighs the alternatives.
6 – Managing one-off user changes
In the TAC, you can make basic changes like assigning a phone number to a user, applying new policies, and configuring Shared Calling.
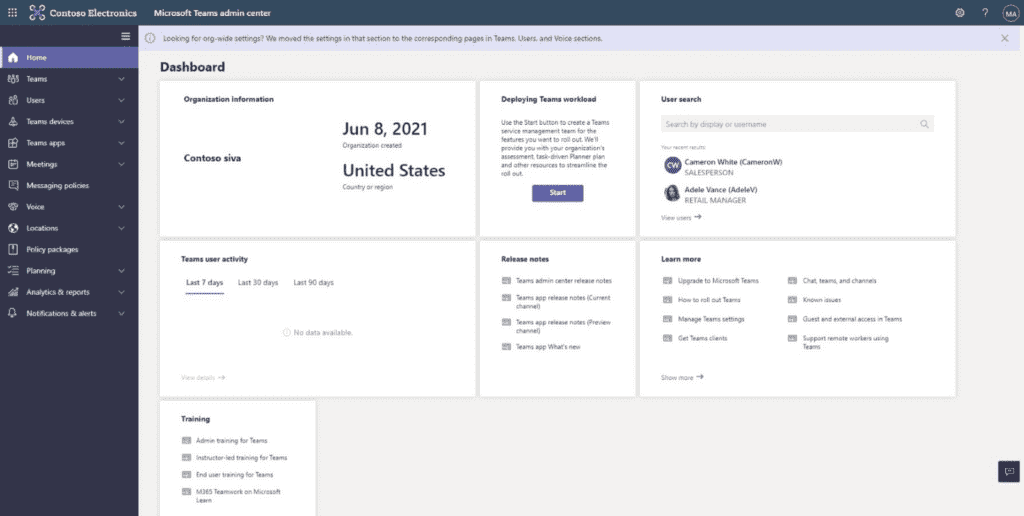
For almost any basic one-off change, you’ll be catered to in the TAC. Just load it up, navigate to the Users menu on the left-hand side, and choose your action.
Access the TAC by navigating to admin.teams.microsoft.com and log in using your Microsoft admin credentials.
If you need to make wholesale or complex changes, you have two options:
- Struggle your way through the TAC then rely on manual scripts
- Use a single pane of glass for Microsoft Teams management tasks
That’s where we introduce you to Orto for Teams.
Originally designed to bring you Microsoft Teams auto-provisioning, Orto is now a full user management solution for enterprise Teams admin tasks.
Whether it’s speeding up moves, adds, and changes or getting a new user provisioned from scratch in the click of a button, Orto covers all your management needs in one place.
You get services and users sorted by location and can apply blanket changes instead of one-by-one.
And it’s not just user changes, either.
Automated provisioning and at-scale user management covers:
- Team access
- Policy assignment
- License assignment
- Number management
- Call queue assignment
- Moves, adds, changes, and deletions
When using Orto, you benefit from zero-touch provisioning directly from Entra ID.
That means you remove the chance of manual error and missed requirements on support tickets.
The next time a new user starts but you/they don’t know what Teams access they need, their needs have already been collated in a user persona.
If they are joining your company as part of the senior HR team, they will get templated access. This means you have a single provisioning ticket that doesn’t need to get revisited every time a user tries to do something new and discovers they don’t have the right license or policy.
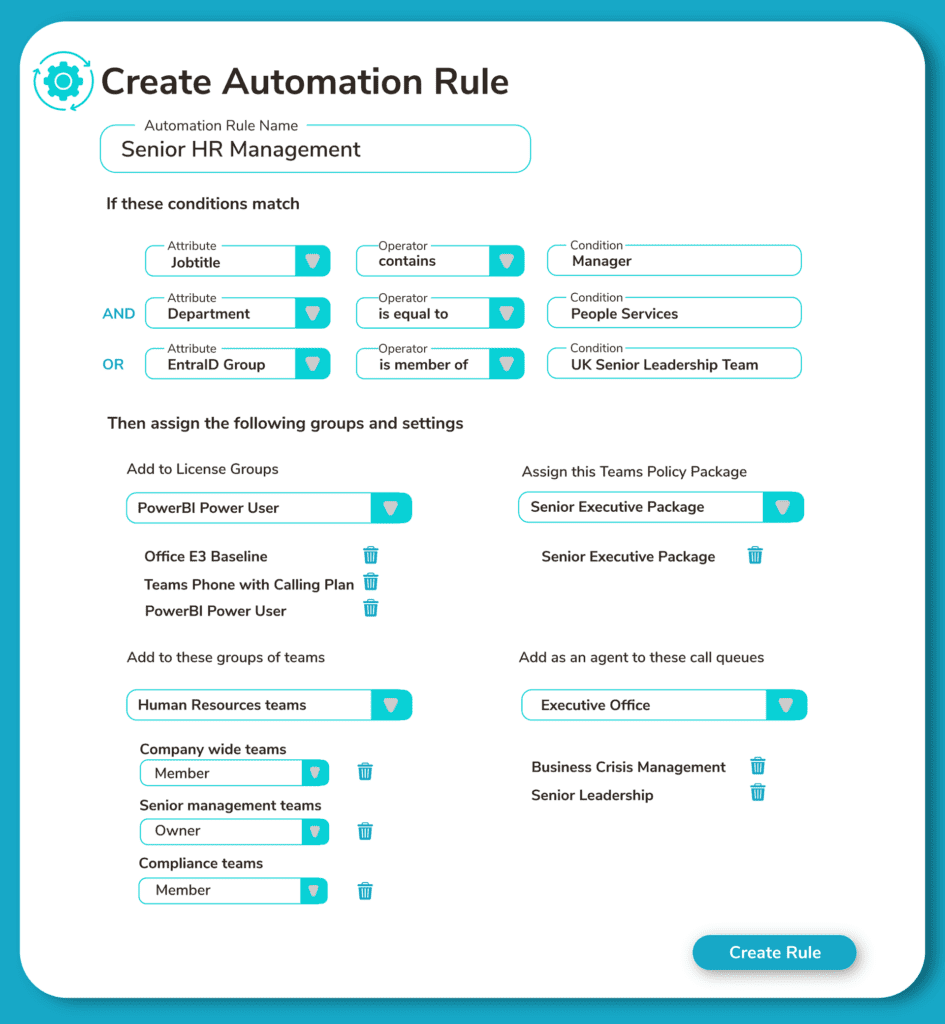
With the ability to integrate with service management platforms like ServiceNow, WorkDay, Zendesk, and Power Platform, the combination of Orto and your ITSM platform means you could save up to $500,000 worth of time and productivity by introducing a new provisioning tool.
Seeing is believing?


