Teams Phone is an expensive add-on.
Even if you use E5 licenses, there are the additional costs of a Microsoft Teams Enterprise licence, number and calling plan that needs to be taken into consideration.
Your use of this feature in many cases therefore needs to be justified rather than automatically given.
You may have heard about our solution, Orto, where you can automatically provision users with Teams Phone, a number, and a calling plan without any interaction needed by you, the admin.
It’s great, you should try it.
But what if this needs to be eligibility tested?
What if the person seeking to use Teams Phone for their work requires their manager’s approval before you provision the user with a number and calling plan?
For this, you need a process flow with approval steps before you get to the automated provisioning of Teams Phone.
Teams Phone provisioning approval options
There are several options available for process approvals. Hopefully, you will already have a system that can do this. But here are some solutions for you to consider.
- ServiceNow: ServiceNow is a well-known ITSM ticketing system used by many enterprises around the world for their IT change and issue management. You can use its service catalog and workflows to create an order process and approval flow that suits your needs.
- ManageEngine: Similar to ServiceNow, ManageEngine is another helpdesk tool with built-in approvals and access to webhooks for process flows.
- FreshWorks: Another common IT helpdesk tool with approval flows and multi-step automation built in.
- Microsoft Forms and Power Automate: If you haven’t got the right licensing with your helpdesk tool, you can use Microsoft’s Power Platform to create an approval process.
Though these tools can front-end a user request and handle approvals automatically, they don’t have the ability to actually action Teams Phone provisioning after the approval has been collected.
For that, they rely on 3rd party tools like Orto.
After the approval has been collected, these systems need to ‘tell’ another system or app to do something, which is ‘go and assign a number to this user in Teams’.
They do this by allowing you to create a webhook or initiate a script running on another system and wait for its response before continuing with the process flow to completion.
The anatomy of a Teams Phone provisioning request
Before we delve into the detail of ‘how to do this’, we need to understand the complexities of a Teams Phone provisioning request.
You might think it’s simple, but it soon becomes a complicated problem to solve.
Let’s look at Amy as an example.
Amy works in the Marketing department at the Notting Hill Office, London, United Kingdom. Amy has an Office 365 E3 license assigned.
Amy would like a Teams Phone number to call suppliers in the USA, UK, and France.
To meet Amy’s criteria, you must:
- Ensure Amy’s Microsoft 365 Usage Location is set to United Kingdom, otherwise you won’t be able to assign a UK number to Amy if using Calling Plans or Operator Connect.
- You must assign the Teams Phone Standard License to Amy’s account to activate the ability to assign a phone number.
- You must identify the type of PSTN access you have available in Teams for the UK, this could be Microsoft Calling Plans, Operator Connect, or Direct Routing.
- If you’re using Microsoft Calling Plans, then you also must decide whether you’re assigning an International Calling Plan, or Domestic, or Domestic with Communication Credits for international calling to Amy’s account based on her calling needs.
- Now you’re able to assign a number, where is Amy located and what area code must the number be located in to support Amy? Amy is in London, so that will be a number beginning in +4420XXXXXXXX. Where do you get this number from? Teams Admin Center for Calling Plans and Operator Connect, or Excel Spreadsheet for Direct Routing.
- If you’re using Calling Plans or Operator Connect, you must supply an emergency location to Amy’s number which should be the Notting Hill office (even though the UK doesn’t require it, Teams does).
Mind blowing, isn’t it?
And this is just a simple use case. No wonder these change management platforms haven’t tackled this with baked in solutions, so it’s a good job we have.
How Orto closes the gap to enable auto-provisioning
Orto doesn’t do approvals, nor does it provide a front-end form submission to request a Teams Phone number. For that, we decided to leave to your IT change management system.
What Orto does do though is give you, the Teams Admin, the capability to build no-code provisioning rules that will configure Teams users with a Phone number to meet their criteria.
AKA the complicated bit others have traditionally left to you to do.
Let’s begin with the fundamental element of Teams Phone, the phone number. Orto syncs your phone numbers from Teams and automatically categorizes them into ranges by type, country, provider, and area code.

You’re then able to sub-categorize these numbers using custom locations so you can allocate certain sub-blocks of numbers to different sites.

Going further, you can even classify numbers by their intended use, using color coded tags, so you can reserve certain types of numbers within your locations and ranges for specific uses, like department.

Number assignment and availability stays synced with your Teams tenant so it will never become outdated or inaccurate, unlike the spreadsheet you’re currently relying on.
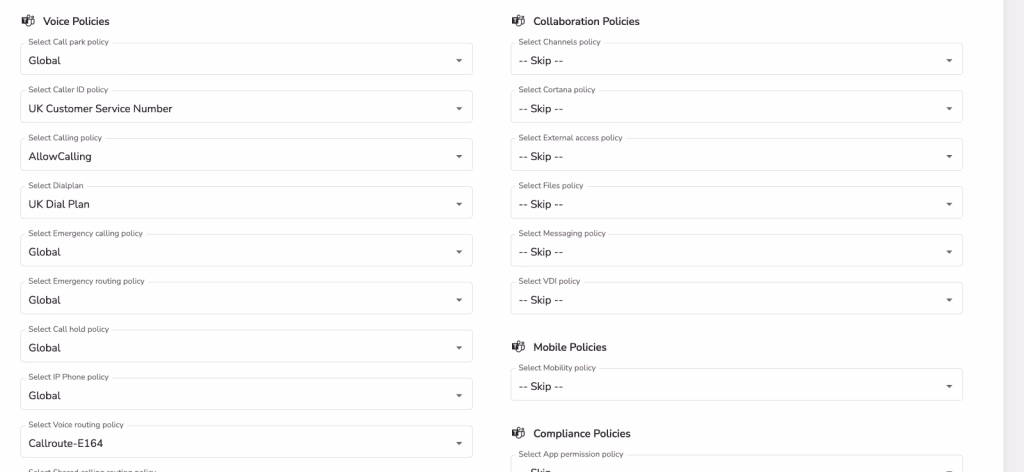
Then it’s the calling experience for your users. Depending on where they are located, the type of Teams Phone you have deployed in that location, and the calling access they need, you will need to assign a bunch of voice-related user policies to users.
These can include:
- Dial Plan
- Voice Routing Policy
- Caller ID Policy
- Voicemail Policy
- Call Hold Policy
- Call Park Policy
- Shared Calling Policy
Assign these policies in addition to a phone number is a chore for you whether it’s by PowerShell or Teams Admin Center. It’s a repeatable process that is time consuming and mind numbing.
Orto makes this easy for you. We have user personas.
You can use these to create standardized policy templates that meet each of your user demographics.

When you come to assign a phone number to a user, you just select the required user persona and all these policies will get assigned to the user as well, taking over 20 clicks of a mouse down to one.
But what about Microsoft licensing?
We’ve got that covered too. You can create license packages that include the required Teams Phone and Calling licenses you need depending on each use case.
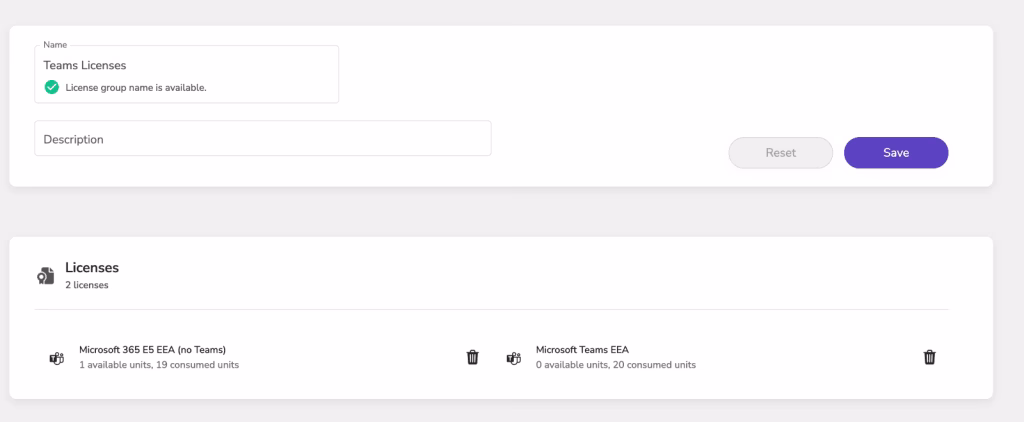
This enables you to apply consistent Teams Phone configurations to users on a repeatable basis with no effort and within seconds rather than 10s of minutes per user.
You can then combine all this power into provisioning rules, so you don’t even have to lift a finger.
You can create a rule for each standardized Teams Phone configuration you need to apply to users based on their provisioning requirements.
For example, one rule for domestic calling and another for international calling in the UK.
You can then build in conditions that the user must match to be provisioned using that rule.

These conditions are built from their Entra ID user attributes or security group membership.
For example: If User is in Country UK and in Office London, then do something.
Then you can apply actions. These actions do stuff like assigning the required licenses to enable Teams Phone, assigning the user a phone number in the correct range/criteria, and assign them the right Teams policies.

The result is the user gets the Teams Phone calling experience prescribed for their use case automatically while you’re making your mid-morning caramel latte.
Tying it all together
Now you have all the tools to be able to provision Teams Phone for users automatically and on request in an automated and self-service way.
You have your IT change management system that’s able to present the user with an order form, generate an approval flow, collect the required approvals, and then action a task.
You also have Orto which will deploy the desired outcome from that request to the user.
Now to bring these together to make self-service. Let’s make automated provisioning of Teams Phone for your users a reality.
There are two ways in which you can trigger provisioning flows in Orto based on approvals.
- By using Entra ID Group Membership
- By using the Orto API to trigger provisioning on-demand
By Entra ID group membership
This is the easiest method to set up self-service provisioning with approvals.
Most ITSM systems have the ability already to add users into a security group either directly in Entra ID or in your on-premises Active Directory.

If you’re using this method, first create an AD group for each deployment type. If you create these in on-prem AD, be sure to sync to Entra ID as Orto only uses Entra ID groups.
Next, create all the provisioning rules in Orto you need to deploy Teams Phone in each office or region.

In each rule, add the condition of adGroup and then select the appropriate Entra ID group whose members will be provisioned with this rule.
Then, apply the actions like license groups and the user persona that applies all the Teams policies and selects a phone number in the correct range for the user.
Repeat for all deployment configurations.
When done, enable auto-provisioning in the Orto portal.
Now head over to your ITSM platform and create your order process and approval flow. Once the approval is received, add the action to add the submitter of the request to the relevant AD group using your ITSM’s built-in modules.
Now, when the submitter sends in the request, their manager will receive the approval, they will approve, and the submitter will be added to the AD group.
Within an hour of the user being added to that group, Orto will automatically provision the user with the required configuration.
Orto API triggered provisioning
If you can’t or don’t want to use the group-based provisioning method, you can build your own approval flows and trigger auto-provisioning using our provisioning API.
This is slightly more complicated to implement on your approval side, but you will have less group objects to manage in your AD.
One reason for using this method versus the group-based deployment is if your process requires confirmation that provisioning has actually been successful rather than assumed before continuing with the process flow, like automatic ticket closure.

To set this up, you need working knowledge of your ITSM workflow management module.
In Orto, you do the same as before in setting up your desired automation rules using the attributes you want to match to each rule.

You can then use the provisioning API, which is an OpenAPI, and post data from your workflow at the appropriate time to trigger provisioning.
To use the API, you will need the following:
- Orto Pro
- An API key (which you generate in our portal)
- Some basic knowledge of how OpenAPIs work
When you submit a provisioning job to the API, the job will be accepted if successfully authorized. The job will be submitted to the job queue and processed in turn. This usually takes no more than five minutes to complete.
The API will return your job ID, which you can then use to request a job update from our audit task API.
Simply add a wait timer in your flow or create a loop to ping the audit API endpoint for a job update every 30 seconds.
When the job is complete, the job status will return a status and an outcome.
- Status = The job process completion state
- Outcome = The outcome of the job task, e.g. success or fail.
You can then capture the job outcome before continuing with your process flow, update your ticket, inform the user, and close the request.
Example using Microsoft Forms and Power Automate
To help you visualize this, I can show you how to implement a simple approval-based provisioning workflow using Microsoft Forms and Power Automate.
First, create a Microsoft Form. You may want to consider the type of information you want to capture from the submitter. For example:
- Name
- Email address
- Country they want a number in
- Whether they need international calling
- What their justification is for need such feature

Next, you’ll need to ensure that their Entra ID account is set up properly with their manager linked. We will be looking up their manager to seek their approval for this request.
Now we head over to Power Automate.
Before we begin, as the Orto API is a HTTP Rest API, you will need access to the HTTP connector in Power Automate. This connector is premium and therefore you will need the Power Automate Premium license assigned to your account.
Create a new automated flow using the Forms trigger starting point.

Once you have selected the form you have just made, add an action for Get Manager v2.
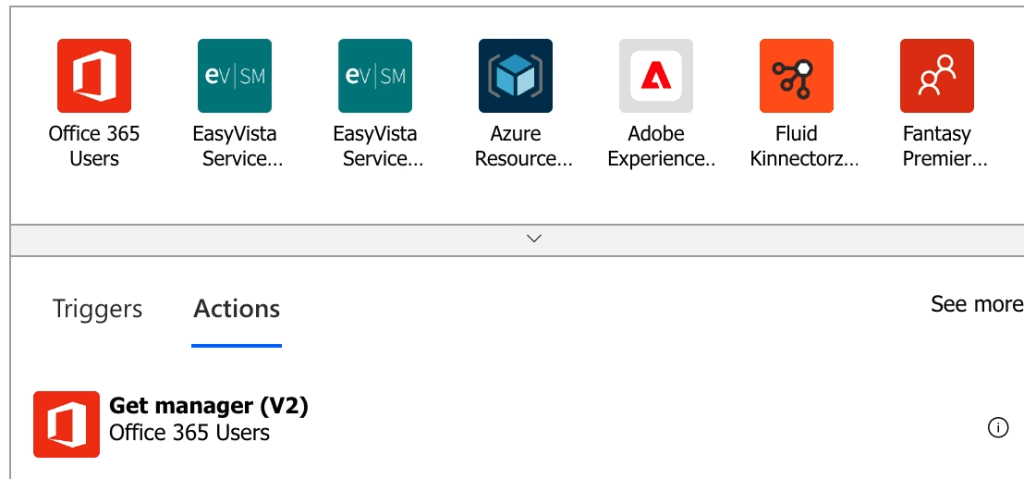
This will look up the manager of the user account as assigned to the user in Entra ID.
Now, add a Start and Wait for Approval action to your flow.
In this request, send it to the email account of the discovered manager and include the form submission details with a call to action for them to approve or reject.
Next, we need to add a condition to handle the outcome of approve or reject.

Setting up the action on rejection is easy. Simply add an Email action to inform the submitter that their manager has rejected their request. You can even include the manager’s reason.

Now, let’s set up the approve actions. In this example, we have asked the submitter if they require international calling. This will be a condition switch between two different personas based on a yes or no answer.
We add an If condition, selecting the international calling required equal yes, then deploy the international provisioning rule for the user.

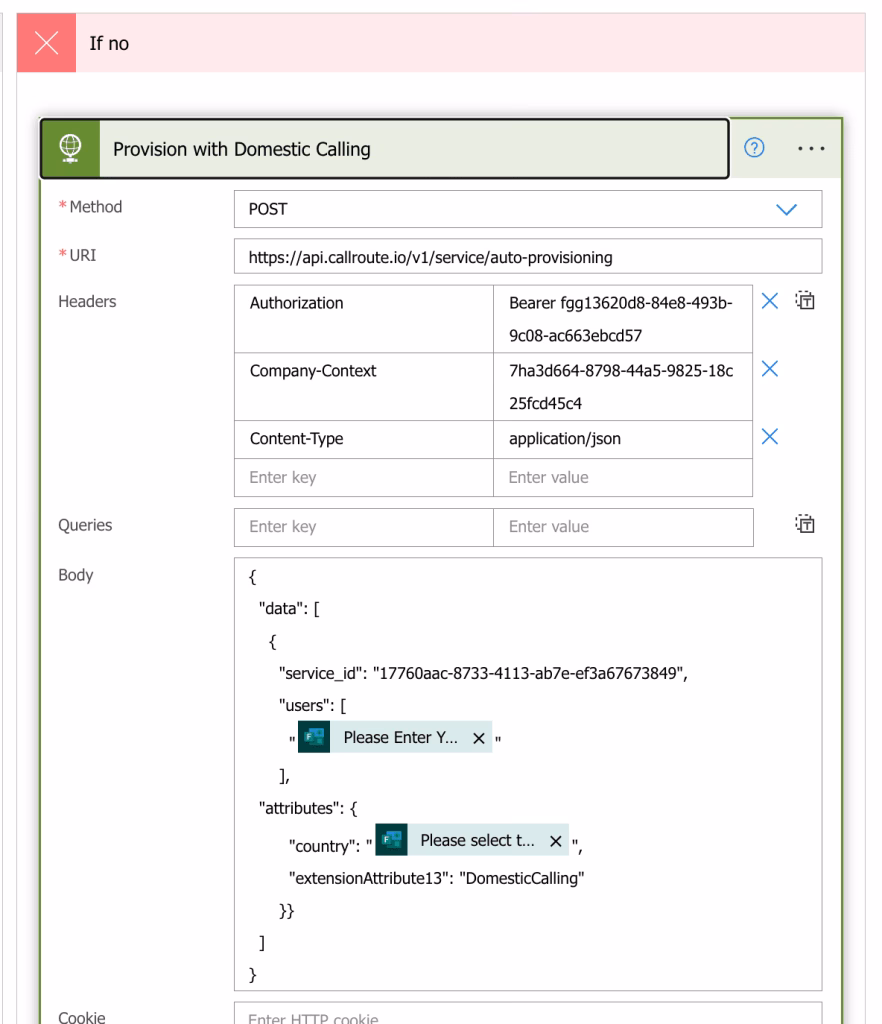
Now we add the HTTP action to send the request to the Orto API.

Replace the API token with your token and the company-context to your Orto tenant GUID and make sure the method is set to POST.
The body of the request is formatted like the example. You will need to change the service_id to the ID of your connected Teams service in the Orto portal.
In the users key, add the UPN from the form submission as a dynamic variable. Then transpose the form data into the attributes.
In the above example, I am passing the country the user wants a number into the country attribute and the international calling flag into a custom extension attribute.
These aren’t written to your AD. They are just used to identify the provisioning rule based on the conditions created.
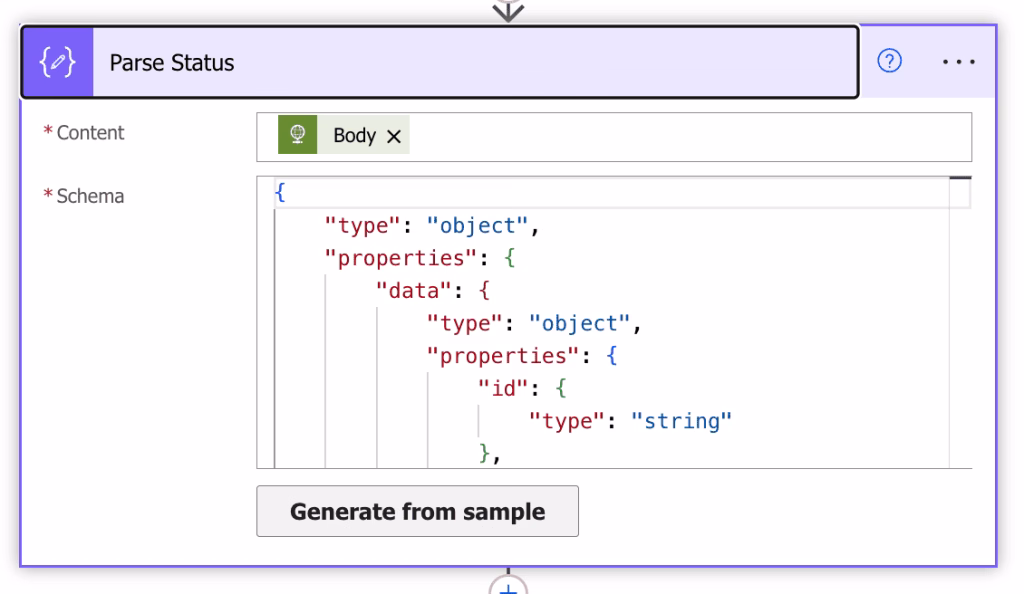
Now we want to catch the response back from the API endpoint. We need to collect the Task ID for the job so we can poll the audit endpoint for the job status. To do this, add a parse JSON action.
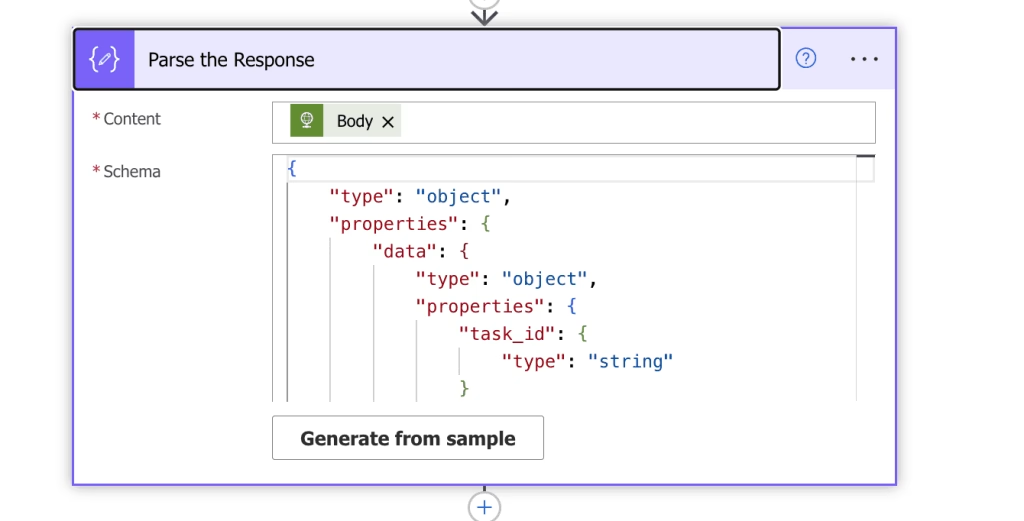
You can generate the schema using the API documentation examples.
Next, we want to create a condition to handle the API accepting or rejecting the request.
To do this, add an If condition and set the status from the HTTP action to equal 202 (accepted). Any other status is a rejection.

If the job is accepted, we want to wait five minutes before continuing.
Add a schedule action and delay by five minutes before then adding another HTTP action to ping the audit endpoint.
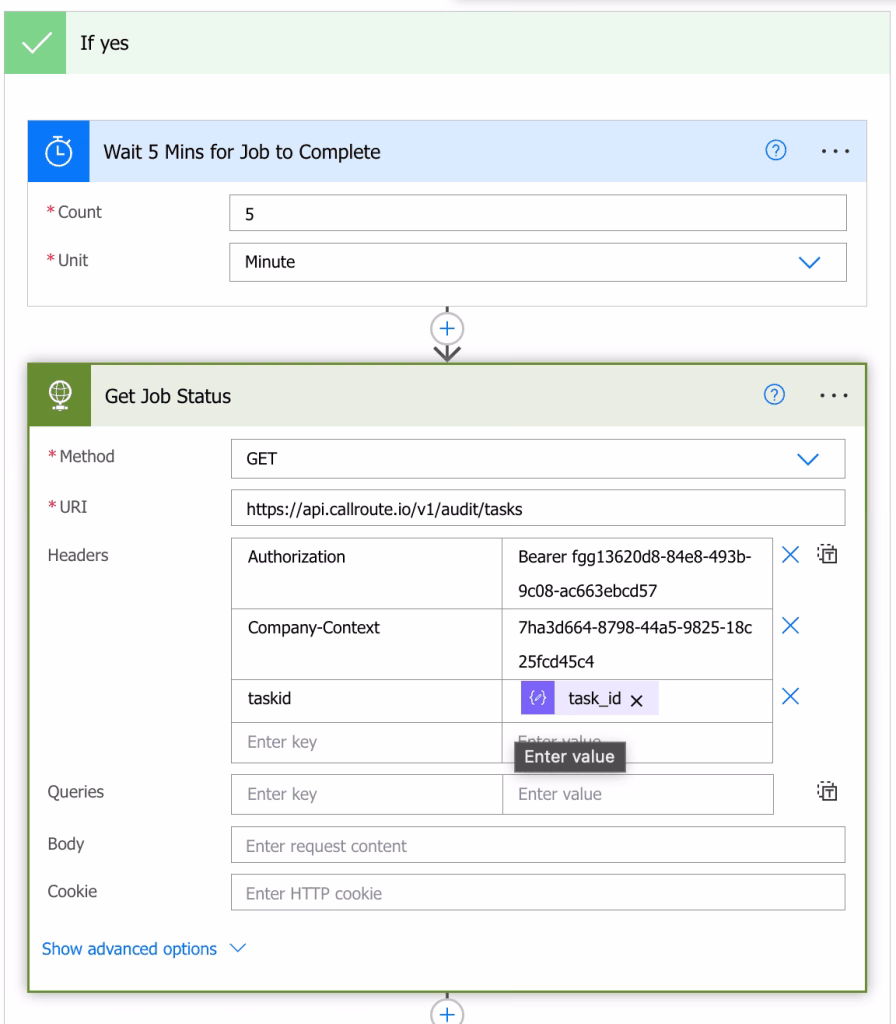
When sending the request to the audit task endpoint, this is a GET request and you need to supply the task_id you received from the provisioning endpoint.
Now we want to parse the response from the task endpoint, so we add a parse JSON action again and supply the body for the response from the task API call.
Again, you can generate the schema from the documentation link.
Now you can create a condition on what to do if the outcome of the job is a success. Add an IF condition, selecting outcome from the parsed JSON and set to equal SUCCESS.
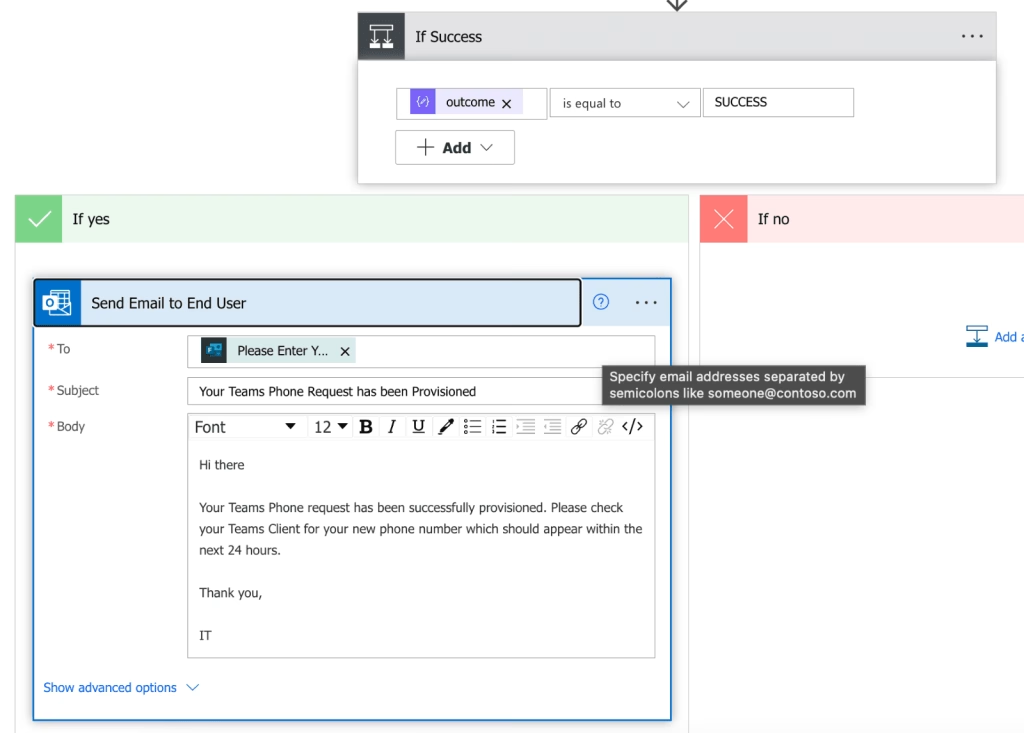
If successful, you can then send an email to the user telling them it’s done (or more actions as you require).
For failure handling, you can create loop retries or simply do nothing.
To implement what to do with domestic calling, when the first condition for international calling is set to no, just repeat the process.
Create a provisioning rule to apply the domestic Teams Phone experience in Orto.

Then target the attributes in your API POST request.
It’s worth noting that you can use Orto for auto-provisioning and approval-based provisioning at the same time. This gives you ultimate flexibility to deploy configurations based on your needs.
The API will also work when auto-provisioning is disabled. This means you can deploy completely based on approvals in full self-service mode if you wish.
Hopefully this blog has given you some insight to the power of what Orto can do for you.
If you would like to see it in action, why not book your demo today?