If you’ve got common area phones in your Microsoft Teams setup, you could be saving money on calls by using Shared Calling.
Instead of racking up a bill per device, Shared Calling allows you to license your entire set of common area phones and split the calling charges across all phones.
How?
We’re going to tell you exactly how to set this up in just a second.
First up, let’s make sure we’re on the same page when we’re talking about common area phones and Shared Calling.
What is a common area phone in Microsoft Teams?
Microsoft defines a common area phone as “typically placed in an area like a lobby or another area that is available to many people to make a call: a reception area, lobby, or conference phone. Common area phones are signed in with accounts tied to a Microsoft Teams Shared Devices license.”
So, we’re talking about universities with shared phones, nursing homes with handsets for emergency access, and frontline workers who need to pick up customer calls in locations without mobile signal.
For the sake of absolute clarity, we’re not talking about conference phones in meeting rooms. While this may be a shared device, they’re not classed as common area phones. As such, they are configured in a different way.
What is Shared Calling?
Shared Calling is the ability to enable outbound calling for multiple Teams users using a single phone number and calling plan.
One calling plan is shared with any number of users. An example use case is a busy CEO who is in board meetings all day. Instead of missing calls, they can nominate “delegates” to answer their calls for them. In this scenario, the CEO’s phone number also rings on the delegate’s handset or Teams client.
Another key factor is when that delegate needs to return a call or make a call on the CEO’s behalf. Rather than presenting their personal phone number, they can present the CEO’s number as the outbound calling ID. This way, if the recipient of the call needs to call back, they effectively call the CEO’s number—reaching them if available.
Setting up Shared Calling for common area phones
Your first step is to ensure each common area phones are licensed to make calls of any kind.
If you’ve already done this, skip to the Turn on Shared Calling section.
Assigning a Teams Shared Device license
Instead of enabling each phone with an E1, E3, or E5 license, you can choose a Teams Shared Device license.
This immediately saves you money by not wasting a user license on a device that can’t perform the majority of the functionality you get.
Instead, you get a Teams Phone license, enabling on-net calling. Once we’ve set up the Teams Shared Device license, we can assign the relevant calling plan to allow external PSTN calling.
Teams Shared Device licenses are supported on any Microsoft Teams-certified device.
To buy this license, head to the Microsoft 365 admin center. Choose Billing then Purchase services. Then follow this path to find the right license:
- Purchase from Microsoft
- View products
- Collaboration and communication
- Microsoft Teams Shared Devices
- Details
Next, choose the number of licenses you need. (You need one license per common area phones you’re setting up.)
When you’re done, hit Buy.
Now, you’re ready to set up each individual common area phone.
Stay in the Microsoft 365 admin center and follow this menu path:
- Users
- Active users
- Add a user
Now, enter a first name and second name. This is left over from Microsoft’s configuration of genuine human users, but you must still complete both fields. We suggest something like Hotel Lobby or Campus One.
A display name will now autogenerate, based on your previous input. You must next choose a username for the device. We suggest you keep this simple and join up what you used for the first name and second name.
Your next step is to create a password. A key element of this stage is to uncheck the option that says Require this user to change their password when they first sign in.
You don’t want a random person to make a call, change the password, and nobody access the phone again.
Finally, select the usage location and assign the Teams Shared Devices license to the account.
Turn on Shared Calling
This final step includes a choose your own fate scenario.
You can choose from these two options:
- Use Microsoft’s retail Shared Calling product
- Use Callroute’s free Shared Calling option
There are pros and cons to each:
| Microsoft Shared Calling | Callroute Shared Calling |
| All billing via Microsoft | Free to set up |
| All admin via the Teams Admin Center | Single pane of glass for Teams admin |
| Option to add auto-provisioning |
The next step in any phone setup journey in Microsoft Teams is to enable external PSTN calling. For traditional phone users, you’d need one of Direct Routing, Operator Connect, or Calling Plan.
However, Microsoft realizes this will generate unnecessary costs for scenarios like common area phones. That’s why you can now use Shared Calling for shared devices.
How Shared Calling is different
Shared Calling for Microsoft Teams now enables Calling Plan customers to share minutes from a single calling plan with unlimited Teams users.
This is a game changer for Microsoft Calling Plan customers, who, until now, have been locked into a relatively expensive proposition versus what is available on the open market.
Using Shared Calling, you buy one calling plan and then enable any number of users licensed for Teams Phone Standard to consume those minutes from the plan. Before, you needed to buy one calling plan per user to enable outbound calling.
Setting up Shared Calling via Microsoft
To consume Microsoft’s own Shared Calling option, it’s a little complicated.
Jump to: Setting up free Shared Calling via Callroute
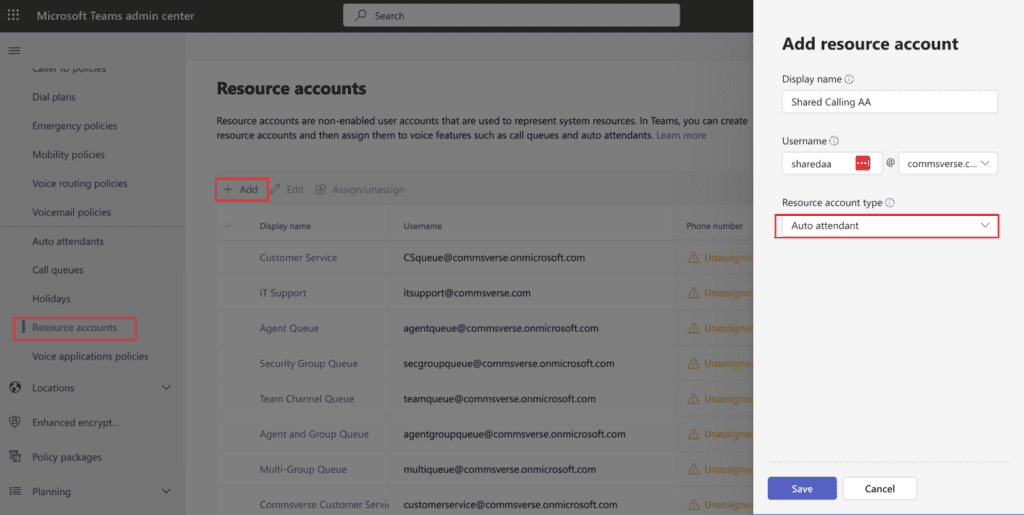
First, you will need to create a resource account for your auto attendant. You can do this from the Teams Admin Center.

Now that your resource account has been created, go to Entra ID and license that account with the Teams Phone Resource license and a calling plan.

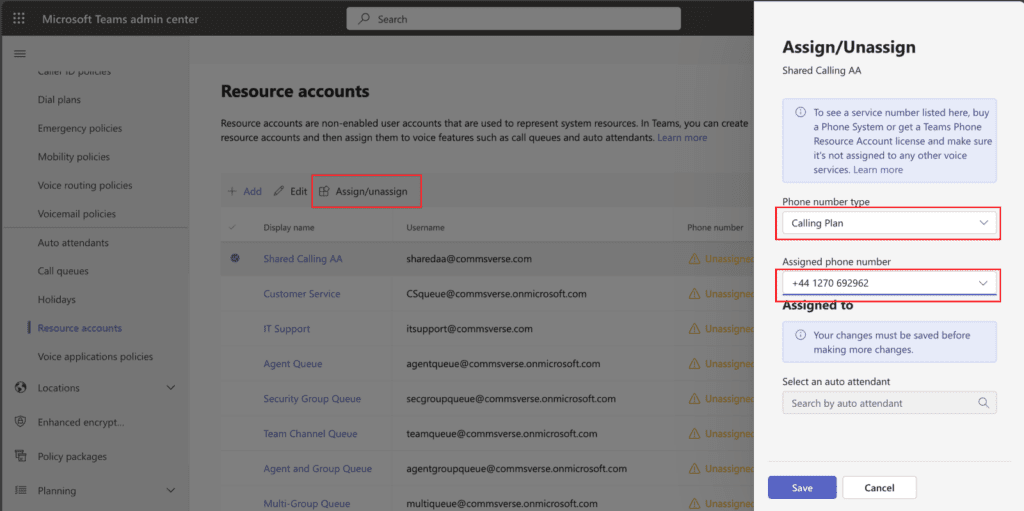
Once licensed, go back to Teams Admin Center and attach the service phone number you want to use as your Shared Calling number to the resource account.

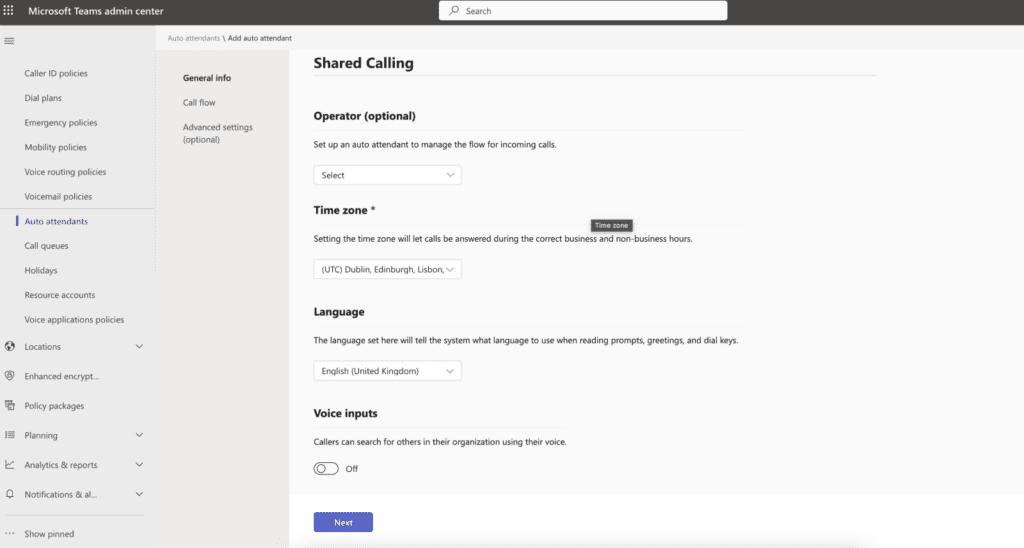
Now create the Shared Calling auto attendant and attach the resource account to the attendant application.

You may wish to enable search by voice for incoming callers to find the person they want to speak with. How you configure your attendant is up to you. You can create different menu options, automatically play a recorded message, route to a call queue, or a person. Or you can simply have the attendant do nothing.
Whatever you decide, an attendant must be created. This is mandatory.
Make sure to add your resource account to the attendant before you save it.
Once the auto attendant is created, you need to assign a location for emergency calling. While this may not be used in the UK, this is required in many other countries where the location of the caller is passed to the emergency call center. Therefore, it is a mandatory step.
To do this you need to use the Teams PowerShell module. Assuming you’ve successfully connected to your tenant, type the following command and copy the LocationID of the address you want to assign to your Shared Calling account.

Now, use PowerShell again to set this location against the shared calling number you assigned to your auto attendant resource account using this command:

Important: Check your Global Online Voice Routing Policy in your tenant. Make sure that it isn’t using any PSTN Usages. If it is, then you need to create a new Online Voice Routing Policy that doesn’t have any PSTN Usages assigned. Then, assign this new policy to your Shared Calling users.
If your Global policy does not have any PSTN Usages assigned, you can use this.
Now you must configure your emergency call back solution. When users make a call to the emergency services without configuration, the caller identity displayed to the emergency operative will be the number assigned to the shared calling auto attendant.
In some countries, it is a legal requirement for phone providers to supply a method for the emergency operative to call back the caller in cases where they are cut off. Regardless of legal status, it is best practice to implement this wherever you are.
Without configuration, the operative won’t be able to reach the user who made the call, instead will be connected to the Shared Calling auto attendant.
You may configure an operator on the auto attendant, but this will waste valuable time as the operator, if they do answer, may not know about the emergency or who made the call. In a life and death scenario, this could be pivotal to the outcome.
To mitigate this, you should add emergency call back numbers to your Shared Calling Policy. These numbers must exist and not be used by another user or service or shared policy in your tenant and be of the same provider i.e. Microsoft numbers.
When an emergency call is made, Teams will select a number from the list of assigned call back numbers within the shared calling policy and present that number instead of the Shared Calling auto attendant number to the emergency call center operative.
This number is then reserved for 60 minutes and mapped directly to the Teams user who is making the call.
Should the Teams user be disconnected from the call prematurely, the emergency operative can call back the Teams user directly using the call back number associated with that call. Essentially, it is like assigning a temporary DDI to the Teams user.
This is vital to ensure connectivity during such a critical time. Failure to configure this could constitute negligence on your part that may lead to prosecution in the future.
To configure emergency call back numbers, first either using Teams Admin Center or PowerShell, find and copy at least two free numbers you have acquired from Microsoft in the same country and area code as your Shared Calling main number.
Be mindful that these numbers will still show as unassigned in the Teams Admin Center and PowerShell subsequently to their use in this policy. You will need to ensure that your support team are fully briefed NOT to assign these numbers to another account.
Now you have these numbers, you need to go back to PowerShell.
Load each emergency call back number into its own variable, like so.

Next, you need to load the resource account attached to your Shared Calling auto attendant into a variable object, using this command:

Now you can create the shared calling policy and attach it directly to the shared calling resource account using this command

Full commandlet reference below:
$ecbn1 = “+441270610369” $ecbn2 = “+441270610370” $scaa = Get-CsOnlineUser -Identity [email protected] New-CsTeamsSharedCallingRoutingPolicy -Identity London -ResourceAccount $scaa.Identity -EmergencyNumbers @{add=$ecbn1,$ecbn2}
Now that this has been created and configured, the last step for you to do is to assign this Shared Calling Routing Policy to your users.
To do this, you need to use PowerShell.

Setting up free Shared Calling via Callroute
You can get Shared Calling for free using Callroute.
The main difference between getting Shared Calling direct from Microsoft versus via Callroute is that the resource account needs a Microsoft Calling Plan and communication credits.
That leads to some major advantages:
- No upfront credit deposit for calls and no credit card required
- No annual commitment on calling plan licenses
- No unused minutes, pay for only the calls you make
- 50% cheaper call charges to UK landline and mobile destinations
- UK support
For initial setup, it’s the same method as consuming Shared Calling via Microsoft directly.
Once complete, you can deploy Callroute using our automated deployment tool.
You can automatically assign Shared Calling policies to users using our persona management tool as part of our Orto for Teams user management solution.
Create your user persona that contains the Shared Calling policy you want to assign, then create an automation to apply this persona to users who match a given criteria.

If you use Callroute for Teams Direct Routing, we offer similar capabilities for Shared Calling, but without the complicated setup.
Unlike Microsoft, where calling plans are issued per user, Callroute calling plans are issued per company.
This means, by default, you benefit from Shared Calling capabilities out of the box without the need for setting up anything complicated in Teams to handle this.
All you need to do is assign your Teams users a phone number and they can benefit from the calling plan you purchase from Callroute.
We offer domestic and international plans from as little as 300 minutes to bundles of 5,000 minutes and more. Or if you prefer a more flexible approach, we also offer PAYG calling on 30-day rolling contracts.
Get started with Microsoft Teams Shared Calling today
Now you know how to configure Shared Calling, all that’s needed is to get signed up.
So, the question left to answer is:
- Do I choose Shared Calling direct from Microsoft or get it free from Callroute?
Other than being free, we thought it best to re-emphasize why you should choose the Callroute option…
- No upfront credit deposit for calls and no credit card required
- No annual commitment on calling plan licenses
- No unused minutes, pay for only the calls you make
- 50% cheaper call charges to UK landline and mobile destinations
- UK support
Sounds pretty good, right?


